Monday, August 22, 2016

Widow Weaver: Creep Factor 10

So I couldn't wait to parade out my creepy doll crew in a Malifaux game. But my buddy and I ended up using just Henchman so we could get used to the rules more. That meant no Collodi, just Vasilisa, going up against the Ortegas. For those of you not familiar with the game, here's the crib notes: after Teddy died, I hid a lot.

I started looking at some Malifaux models who would fair better on their own and came across the enormously freaky Widow Weaver. After getting my butt handed to me last game, I started assembling her.  She has a teeny tiny jaw piece that bounced out of my hands and I spent 45 minutes crawling around on the floor looking for it. 

A little green stuff to fill the gaps and I got her together.  

Yes, that's a spider faced woman in an 1800's dress.  The style (I think) is 1870's England. She has a bit of drapery on the back, which I found out was called the bustle. It's funny to think of today's obsessions with the female rear end and see it all the way back in Victorian fashion. Still, Widow Weaver doesn't have the Seurat Sunday-in-the-Park, 1890's style"I'm actually a snail in a dress" bustle.  And thank God for that, because who wants to see a insect lady bounce the junk in her trunk?

A little white paint, a little black wash...

As to color scheme, I liked a light pastel colors on the clothes, XV Legion (and a nice muddy train to boot) did a great job, though I would like her skin to be a deeper purply-black to provide some contrast.

Accents are always a challenge for me. They can make the figure pop or confuse them.  On Widow Weaver its the fan bits, umbrella trim, and the back flower decoration. Some painters made the accent color a bright red, but for me that was too garish. Eventually, I decided on a cool turquoise.  

Color Scheme: 
  • Skin - Reaper Twilight Purple with black washes
  • Eyes - Reaper Bright Red
  • Lower Dress and Umbrella Canopy - Reaper Pink Entrails
  • Upper Dress - FolkArt Bayberry 
  • Wig - Reaper Concrete Grey with Ceramcoat Purple Smoke wash, FolkArt Dove Grey higlights
  • Trim and Umbrella Fringe - FolkArt Camel & Parchment
  • Umbrella Shaft - FolkArt Coffee Bean
  • Accents -  FolkArt Aqua 


Satisfied mostly with the first coat, there were a few things I noticed.  The eyes didn't pop enough. And the skin tone was flat out purple - not purply-black. So she looked more "alien" than "spider lady".

This was one of the first time I use my inks (Privateer Press P3 line). Inks do make a softer transition between the colors, but it's very subtle and unlike a wash, it can't go just everywhere.  I got a look I was pleased with and added her to a base.

I couldn't resist adding the black widow marking on back of the neck like the box. A little freehand work - I had to paint the shape in white first. Ceramcoat Cinnamon, and then outlined in Reaper Mustard Yellow. A little Reaper Bright Red to make the certain bits pop, and then a black wash to blend back into the skin.
Then there was the matter of her base details. I knew I was going to do my Terraclips Cities theme again, but like Sonnia, I wanted to do something different than stray rocks or weeds. One of Widow Weaver's abilities in the lore (and as an upgrade) is to create a Wicked Doll or a Teddy. So I got an idea from some of the smoke ideas I've read about and decided to create a spell effect - like a little doll was being conjured.

I made a little Teddy out of green stuff using a mold I made from an orphanage base.  Then I sprayed some cotton pieces with a mixture of PVA glue and water. The cotton gets really wet so it's important to play with it and get a little separation between the fibers.

I thought I got the wisps to curl up enough like a magic spell smoke had just gone off.  After affixing the both pieces to the base, I gently applied some Superglue on the cotton-smoke to harden it more. 

I showed my wife what I'd done and she looked at the white smoke cloud and said, "Is that supposed to be a cradle?" So I decided the cloud needed some more "wispy bits" going on.

Every time I take a picture of what I thought was final, I'd find some bit that was off. On this model, it was the beaded hem. Freakin' beads, they were so tiny black wash just made everything black, and white drybrushing made everything a stream of white. But I wouldn't see it until I took a picture. I'd get the lighting right take a snap, and find a spot that had too much wash. Or too little. Or no definition. Or plain ole sloppy.  GAH!

So I think these are the final shots.

Monday, August 1, 2016

Sonnia Criid 1: Sly and fiery

One very l lucky gift I got was a slew of Guild miniatures (thanks to my nephew Josh), including Sonnia Criid and her crews in metal.  I had to recreate her left leg under her coat with some greenstuff (simple thanks to my Instant Mold) and her cigarette was missing. But otherwise, she was in really good condition.

Primed white, black wash and thought about the color scheme for everything except the coat.  I've seen Sonnia with blond hair and black hair, but I really couldn't picture without red hair.  My goal here: I also got the Sonnia Avatar with her, so I wanted to paint the two Sonnia figures simultaneously.  So the color scheme challenge here was to get a scheme that would work with a yellow glow I'm expecting for Object Source Lighting (OSL) on the avatar version.   

Coat color was my big challenge.  The lapel needed to be the same color as the inside of the coat seen at the bottom.  I was going to avoid the classic color when I found a two tone coat color that I liked.  This would reflect the OSL glow in the other model and I was convinced classic Sonnia color scheme (referenceworked.  So - classic scheme it was.  I set out for the pallette.

Coat 
Vallejo Heavy Brown - main
Reaper HD Golden Brown - undershadow wash
FolkArt Walnut Brown - wash
Reaper HD Desert Tan - 1st highlight
Reaper Yellow Ochre - 2nd brighter highlight 

Hair
Reaper HD Sunburn Flesh - main red color
Cinnamon (Reaper Ruddy Brown) - wash
Reaper HD Woodland Brown - 1st highlights
Reaper Rosy shadow - 2nd highlight

Jeans 
Reaper HD ash grey - main
Dark Grey - wash
FolkArt Cobalt Blue - undershadow

Shirt 
FolkArt Parchment - main
FolkArt Light Medium Grey - Wash
Reaper HD Concrete Grey - undershadow wash

Cuffs
Reaper Bloodless Skin - main
Reaper Moldy Skin - wash
Reaper HD Ashen Brown - undershadow wash

Started with the eyes - and I felt like for a moment I was looking at ScarJo.


The first coat she really started to come together.  I was really happy.
And... then.. 
And... then.. 
I had to go and screw around with the eyes. Why?  Why did I screw with my number one rule? Because I saw this article from the hyper talented Marike Reimer and thought "Hey a tiny dot of white will give that eye some shine!"  Instead, I messed it right the hell up.  So I had to repaint the right eye white and outline black.  But now the eye on the right was way too big.  I just couldn't get it fixed.


 Eventually I figured out that the black had gone past the eyeline and onto the face and toward the ear.  So I had to work the face color from the hairline in until it looked right. It may sound obvious now, but at the time, it felt like a miracle that I figured it out on my own.


I used a non-metallic metal (NMM) technique for the sword and chains. Did anyone ever state how much of a pain in the ass NMM on chains are?  It's a ton of work trying to get a little metallic shine on every stupid chain link.  

Anyway I went for fire theme on the sword details which you'll see in later pictures using Reaper HD paints. Mounted her on base using my Terraclips Cities pallette.  Also managed to spill super glue all over that right leg, so it was unnaturally shiny. 

I've done this before and the solution is Testor's Dullcote.  Had to learn the hard way on that.

So far, very pleased. Now I needed to focus on some other details.  The classic Sonnia picture has her holding a cigarette in her fingers, but it broke off the mini along with her left foot apparently. I tried to glue a new one back on, but one small bump and it broke off.  Being that I wanted to use this mini in games, that wasn't going to work.  I had to start thinking out of the box. It seemed logical that she would be holding a soulstone. So with a reference or two of its bluish glow, a soulstone would be where the cigarette once was.


While fixing the soulstone, I started thinking about what to put on the base. There was the usual standbys of weeds and stray stones, when I wished I could bring the fire theme to the base like the Avatar. Then I remembered I used this technique I'd read online to create smoke puffs fron Q-tips. 

And I just so happened to have some leftover "smoke" from some shadow figures I'd been working on. 

Picked one I liked. Ceramcoat Purple Smoke with some Ceramcoat Cinnamon with touched of Reaper Ruddy Brown and Burning Orange on the underside.


Suddenly a look fell into place: Sonnia has just finished crushing a soulstone to burn something up, and she cockily looks to the side as the ignited item snuffs out. 

Here's a shot with it mounted where you can see the soulstone.


And here's one from the backside.  Better pictures to follow with a better camera soon.

Tuesday, January 5, 2016

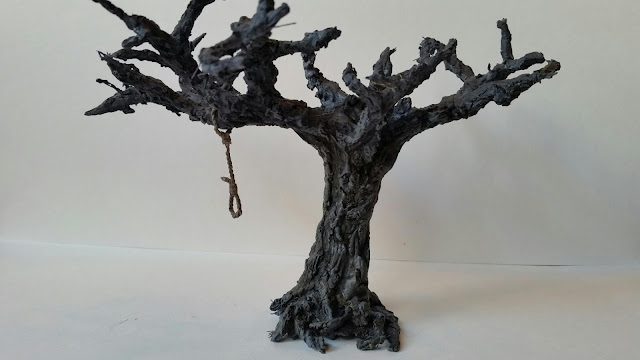
The Hanging Tree 2: Bark Is Not Brown

I originally wanted the tree to have a dead look to it, which from what I've seen, meant no brown.  But when I looked at what I had at the close of my first post, which had no brown, I wasn't happy. 

So with my very grey-looking tree, I used some dry-brushed in some FolkArt Mushroom and then Barn Wood on top.  I also washed in some more black, FolkArt Coffee Bean and FolkArt Fawn.

Still not happy.  Now it just looked like a stone tree.

So I looked up a few trees that were actually used as gallows trees.  Running this one picture through Reaper's Power Pallete (such an awesome tool) - yes, the greys are there, like the Ashen Grey I used - but it's juxtaposed with strips of olive and mossy greens.

Meanwhile running this picture of another in Texas the undercoat has very dark browns - like in a brown liner or walnut brown.  But where the light hits is a dark muted greyish-purple, which Reaper notes it as Dark Elf Shadow and Dusky Skin Shadow.

My painting buddy and I were talking about the color palette trees. During the winter season, I see a lot of leafless trees on my walks.  We both observed that - despite all your crayon drawings as kid to the contrary - most trees are not brown. Or at least not the bark of most tree (pine trees excepted).  The outermost layer of bark (called "cork") is usually grey. Couple layers under that is secondary phelloderm, which is more brown.

Eventually I got it right or close to right.  Its all about washes. Rich brown washes in the underside shadows, mossy green washes on the side hidden from the sun, and some final very wet black wash to end.  A little dove grey highlights at the top, but otherwise its all in the wash.

Here's the backside...

The Hanging Tree 1: Framing It Up

So in Malifaux, the Hanging Tree is an iconic landmark to warn visitors and immigrants to obey the law or dangle from a rope. It's the third thing travelers on the train see before pulling into the Malifaux. There's a cool official mini that Wyrd sells on holidays, and I've always been tempted to buy it, but the price tag is a big turn-off.
Since I've been reading more terrain blogs and watching some videos, that cost-effective voice perks up and says, "I could do this myself."
So here goes my Xmas 2015 experiment.
I'd kept and old extension cord ever since I saw this YouTube video on making wire frames for miniature trees.  So one game session I stripped it and made a tree with one long arm perfect for a rope to throw around.

Knowing I had to apply wood filler, I applied some masking tape so it had something to stick to.  Here's a shot of the the taped up frame with some putty applied to the trunk. 


I'd tried some white wood filler from a tube on another mini but nothing got the wood feel quite like this stuff from Elmers. It's pretty amazing how little you have to apply. But you really need to make sure you get some watered down PVA glue or wood glue to harden it up after it dries.  It crumbles really easily and moving it around is a mistake.

Slowly adding filler up the branches...

Filler progressing up the tree.

At this point, I realized some of those branch ends had to go.  Time to trim them up.

As to the base, I added some spackle to get a simple impression of the trees underside.  Spackle works for that dirt feel (though like the wood filler, it needs some watered down PVA glue to harden it up).


The Hanging' Tree sits by the entryway to the city so I wanted to get some city cobblestone underneath - to get that  impression this evil tree is bursting up over the city, unable to be subjugated. The green stuff was used for  cobblestone  (once again, using miniGirl's template). Spackle was used for the dirt.
Applied my Terraclips City color scheme, and some Burnt Umber for the dirt color.
Had to break to hangman's rope into two sections: the rope around the tree and the noose. For the noose, I used "InstaMold" to copy the noose from the Malifaux Bayou Accessories pack.For the rope, I straightened two paper clips and then twisted them together to create the rope hanging from the branch.

I primed the whole tree section with Army Painter Uniform Grey, and did a little black wash but I decided against drybrushing white.  Most dead trees seem to have a strong grey hue so muting that as the undercoat I felt would undo a good start.  The rope I gave a light brown coat - combining Linen and Coffee Bean (FolkArt).
I eventually decided on using Reaper's Ashen Brown from their HD line as the main coat. Its a very muted brown with a hint of purple to warm it up a little. I watered it down to a thing glaze and gave two coats. The first went everyehere. The second was more selective, leaving some if the knot holes untouched for the grey to come through.

More to come.

Friday, January 1, 2016

Vasilisa 2: The Duller Details

After my first pass on Vasilisa, I feel I'm looking at someone dressed in bright interesting colors yet is supposed to have been through the wastelands.
In the same breath, the wood grain got a little too faded thanks to over-applying the dark Walnut brown glaze by accident.
So first up to fix: that cloak - too bright a purple.  So I mixed the base color (Ceramcoat Purple Smoke) with a little Dirty Grey for a heavy glaze to dull it down. Conversely, I took a little of the wood grain base (FolkArt Teddy Bear Tan) with a brighter yellow (FolkArt Buttercup) to punch it up in the muddy areas.

I started working a plaid design that I figured was appropriate for all the half cloaks I'd seen. I wanted something detailed but not really interesting, like a tartan.  Using the colors I already on the figure I pulled a pattern together on my pallette.


The tricky part was applying the stripes in a realistic way that clothing hangs - especially since I've broken her cloak into two pieces.  I found a pic or two that was a little helpful, but getting a good 180° view was night impossible.  Time to just put brush to figure and wing it.


I eventually got something that was okay.


The pattern by the arm holding the spool (not yet attached) was messy.  The lines didn't meet up exactly and I had to flub it a little.  It's noticeable to me, though not sure it's as obvious to others.

Here's she is on the base. Front side...


.... and backside.