On my recent travels through the Finger Lakes, my wife and I came across a brewery called The Beerocracy. With I name like that, a tasting was mandatory. I was familiar with English style ale so the samplings had a wonderfully warm tone and maltiness. Plus, the traditional English style pub added some apropos atmosphere.
The bartender proudly announced they were the only brewer of "real ale" in New York. At first, I thought was just snobbish bit of boasting. But I later learned it was another name for cask ale.
Around mid-20th century, aluminum kegs began replacing traditional wooden casks. This transition prompted cask-ale-lovers to sponsor the Campaign for Real Ale. And thus, cask ale was synonymous with real ale (or in the UK at least).
What's the fuss? Well I might be used to it, but apparently keg beer is "fizzier". Modern brewing techniques keep beer under a "blanket" of carbon dioxide so oxygen never makes contact throughout fermentation process to the keg. The carbon dioxide also gives keg beer its carbonation.
But before keg beer, brewers didn't know how to kill the yeast after the primary fermentation process. So cask ale was delivered "alive" (i.e. yeast alive and still making alcohol) to the pub where they had to store and handle it properly before tapping. Cask ale is less effervescent than keg beer since no carbon dioxide is pumped into it. But it tastes maltier and tastes as fresh as if poured at the brewery, i.e. "brewery fresh".
Ironically, I had been lucky enough to be gifted several miniature barrels for my birthday presents. But after lagging behind my painting sessions, it was time to get over myself and see if I could "knock it all out". I looked on YouTube to find a nice and quick barrel painting tutorial. Happily, I found How to Paint Wooden Barrels by "Watch It Paint It", which looks like it would result in something I liked.
I made the following substitutions borrowing a lot from my Vallejo NMM paint set:

And of course, once I knocked all that out, I had something I liked... but could not leave alone. I kept thinking the bands (which are called hoops) looked better when they were all black. In my mind's eye, I guess what I imagined were beer barrels were closer to older barrels. New ones have a shiny steel look, but I prefer an older "just rolled up out of the cellar" look.
The barrels on the left were probably made with a 3D printer. It's my first time painting something made this way, and I felt many details were missing. The paint slips in between the cracks of the plastic "tubes" with brush painting. I think an airbrush would work a lot better with these.
More on the thing in the middle on the next post.
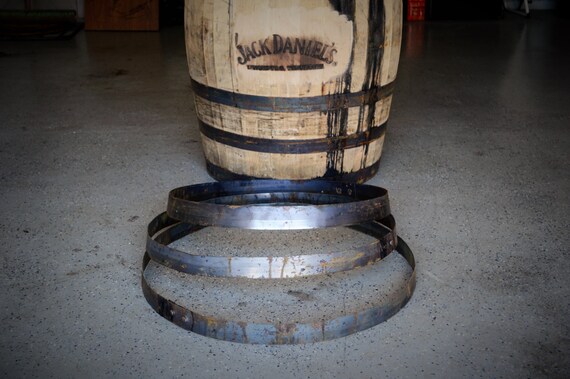
On the subject of corks... I always love having terrain that a mini can stand on. So I drilled a small hole in the top of each of the kegs, and glued in a magnet. That will be our cork.
Barrel/Cask Color Scheme
Zooming in on cork you see a "flaky" pattern that I wanted to replicate. Being the magnets are so small, I thought the best method would be to layer the dark up to the light - rather than base with wash and borders painted on.
That of course makes this first pic a complete lie because it's so washed out the color is too bright. But keep my theory in mind. I'm still on the fence as to whether I should have stopped at #2.
1) Butter Pecan Base. On the top one you can see I started adding the Dark Skin Shadow to get the cork texture.

2) Heavy Glaze of HD Golden Brown, and then add more cork texture (Dark Skin Shadow)
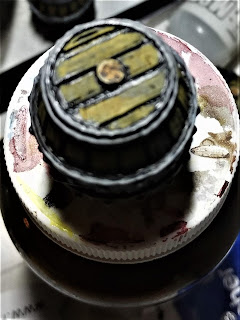 3) paint in the highlight (Fair/Bloodless Skin) inside the border


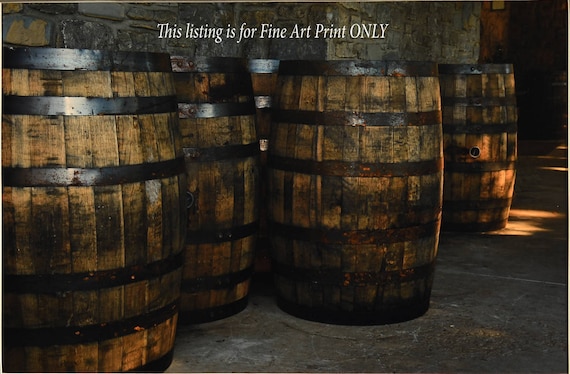
Brown added below the middle of the hoop to show where the shadow begins.

Just above the shadow line, I used Reaper Cloudy Grey and Misty Grey for strongest highlight and Heavy Glaze of Vallejo Turquoise to get the metal gleam right.

A little heavy glaze of Reaper Armor Grey around the gleam to smooth the transition.


I made the following substitutions borrowing a lot from my Vallejo NMM paint set:
- Vallejo Charred Brown = FolkArt Teddy Bear Brown
- Vallejo Leather Brown = Vallejo Heavy Brown
- Vallejo Bronze Fleshtone = Vallejo Heavy Gold Brown
- Zombicide Machine Metal = Vallejo Cold Grey
- Zombicide Survivor Shader = Vallejo Black thinned down to a wash

The barrels on the left were probably made with a 3D printer. It's my first time painting something made this way, and I felt many details were missing. The paint slips in between the cracks of the plastic "tubes" with brush painting. I think an airbrush would work a lot better with these.
More on the thing in the middle on the next post.
On the subject of corks... I always love having terrain that a mini can stand on. So I drilled a small hole in the top of each of the kegs, and glued in a magnet. That will be our cork.
Barrel/Cask Color Scheme
- Hoop - Reaper HD Armor Grey, Edges Reaper HD Ash Grey
- Lower Hoop Areas - Dusky Skin Shadow, Dark Skin Shadow, Vallejo Black
- Gleam transition - Reaper HD Ash Grey, Reaper Cloudy Grey, touch of Vallejo Turquoise or Reaper Misty Grey
- Cork - FolkArt Butter Pecan Base with heavy Reaper HD Golden Brown glaze, Reaper Dark Skin Shadow border with Fair Skin and Bloodless Skin Highlights (more on this)
Zooming in on cork you see a "flaky" pattern that I wanted to replicate. Being the magnets are so small, I thought the best method would be to layer the dark up to the light - rather than base with wash and borders painted on.
That of course makes this first pic a complete lie because it's so washed out the color is too bright. But keep my theory in mind. I'm still on the fence as to whether I should have stopped at #2.
1) Butter Pecan Base. On the top one you can see I started adding the Dark Skin Shadow to get the cork texture.

2) Heavy Glaze of HD Golden Brown, and then add more cork texture (Dark Skin Shadow)


The lighter colors were too bright for the color scheme I was going for.
Anyway... Next I really wanted to recreate the hoop gleam from my main picture reference. There's a touch of blue in some of the gleam which I used the Turquoise from NMM. Newer barrels don't seem to have that color in hoop. Older hoops seem to have that variance in color.
In this starting pic, you can see the where I had the shadows beginning with a heavy glaze of the Darker Skin tones to delineate where the transitions would be.


Just above the shadow line, I used Reaper Cloudy Grey and Misty Grey for strongest highlight and Heavy Glaze of Vallejo Turquoise to get the metal gleam right.

A little heavy glaze of Reaper Armor Grey around the gleam to smooth the transition.

The painting experience on this was a little frustrating due to the 3D printed stuff not taking the paint too well. Even when completed, you can see bits that stick out compared to the D&D ones which made from a mold. That said, getting practice on the metallic "gleam" was good experience.

This seems like a lot of time on the style for barrels and casks. Part of all this work is to hopefully get better at knocking this stuff out quickly. Mastering the little details hopefully builds talent. But there's another reason. In fact, someone once asked me this very question...
No comments:
Post a Comment