Sunday, October 4, 2015

Vasilisa 1: Contrast to Collodi

Next up from the Master of Puppets set was the new Henchman introduced in Malifaux 2E, Vasilisa. Her story is thematically is the same as Collodi's, but her style couldn't be more different.  Where Collodi had the lush appearance of a stage performer, Vasilisa looked like an old woman in a babushka.  Or something like a babushka, cos I'm still not sure what that is she's wearing.  It's somewhere between a headscarf and a poncho or halfcloak.

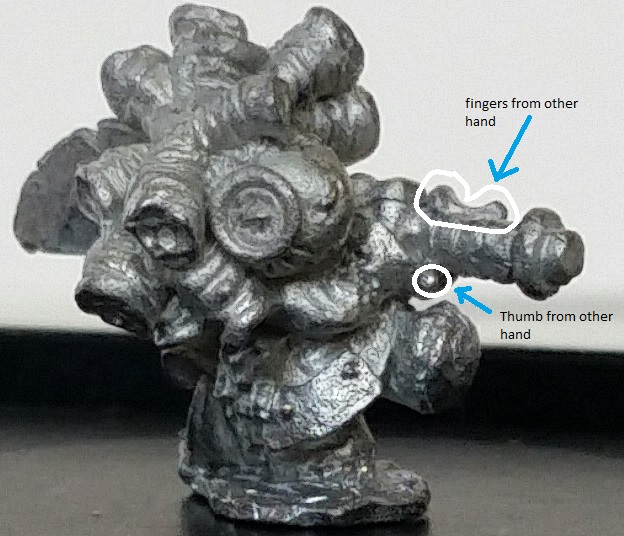
One thing I learned to do after painting pieces after I assembled them: hold off on assembling if there's a hard to reach area.  On Vasilisa, this meant don't assemble the one arm reaching into the side bag for a spool.  Paint the inside of that bag first... THEN glue the arm on. It's hard to get the finer details right when there's a obtrusive yet delicate piece in the way.

I always go for the "under" layer first, which normally means putting on flesh color. Here it means wood grain. So I did my brown lines with a heavy glaze of FolkArt Teddy Bear Tan, as I had with Collodi. 

Now for the overall paint scheme. She obviously has an old sewing woman look, but what exactly did an old sewing woman look like about 100 years ago? *shrugs*  Let's see what the Internets have to say.

Results: Do I trust Charles Edward Wilson? Okay. Yeah. *shrugs again* Sure, I do.

I decided that she would have a couple different colors involved.  An off-white for the apron, FolkArt Olive Green for the dress, a duller purple for the ratty old cloak, a dull beige for the babushka (FolkArt Barn Wood) - and if Charles Edward Wilson is to be trusted -  some plaid stripes over top.

Her cane I just did two heavy washes of Folkart Walnut Brown.

I wanted to get a nice yellow-brown leather on the bags and straps so I chose FolkArt English Mustard.  Honestly though, this is mostly because it reminds me of Games Workshop's Snakebite Leather, the one color GW I felt nailed.

Overall, I was shooting for a color scheme that would not be as lush as Collodi's, yet still use some of the same base colors (purple, yellow, green). That presented some challenges. For example, a dark cloak seemed like a good idea so I chose what I thought would be a muted purple. 

But it still came off too bright.  So there were some items to clean up on the second pass.

Wednesday, September 30, 2015

Collodi 4: Tightening the Strings

While I finally hit the color scheme I liked, I needed some separation on the stripes. I tried a darker purple but the colors were too dark and it just faded in. So black it had to be.

I also liked the near silver tone in the pattern that ran down the middle of the gild stripe, but didn't want to go through the aggravation of drawing out the actual pattern itself.

I used a very thinned-out white wash for the highlights on the folds and thinned out black wash for the shadows on the folds.

On the underside of his tri-corner hat, I found a little bump that may have been from when I cut him off the sprue. Rather than try to cut it off and re-do the painting, I figured I'd highlight it, like it was a gem or a decoration.  I actually think it looks like it belongs there.

Over all, very pleased with the faux wood grain I painted in.


I used a little FolkArt Midnight Blue to get a darker, near-velvet deeper tone.  

Sunday, September 27, 2015

Collodi 3: Colors on the Puppeteer

Wyrd makes miniatures that are insanely detailed for plastic, and insanely complicated to put together. My FLGS pointed out that I should grateful I don't play Von Schill and had to assemble his Steam Trunk. I am.

But for all the details, I'm a little surprised they didn't make the wood look like wood. So I added the detail myself.  I applied little wood lines with Van Dyke Brown like I had on the straight razor and the rolling pin on Collodi's party crashers.

I searched for a color scheme I thought would be comparable to an Italian puppeteer. I eventually found one I fell in love with as it had that beautiful shade of purple that was very stylish.

For reference, that's a Venetian marionette of Mangiafuoco - the evil puppeteer who kidnaps Pinocchio in the story written by Collodi himself. If that's not a nest of intertwined references - I don't know what is.

Liking the color scheme meant more stripes to paint. My first pass was FolkArt Raspberry Wine and Olive Green.
.

The back had a lot more folds. It was kind of fun trying to draw a straight line and see where the brush took me. The overall effect to me looked like he was stepping his right foot forward, and the cloak on the floor was dragging in that motion.

The topmost green stripe should have gone all the way to the edge of the overcoat. so I had a little repainting to do.  But what really bugged me was what I painted looked less a  stylish wardrobe and more a Rita's Water Ice sign. It all had to do with that FolkArt Raspberry Wine color. 

My painting buddy happened to have a Ceramcoat Grape handy which blended into this beautiful royal color. Once I re-painted the stripes with this color I knew that's what the hat and robe should be. One catch I ran into when I went home to do some touch-ups: According to a discontinued Delta color chart I found online, Delta no longer makes "Grape". Did a little testing and eventually found Anita's Violet was a decent match. But the search made real something I already suspected: most paint lines have slew's of options for tans, browns, yellows, greens, oranges and blues - but purple is much more limited.  You really have to borrow from different paint lines to get a good palette. 

FolkArt Teddy Bear Tan was the middle stripe.  For the wood, I followed the same pattern as the wood handle on his doll friend's straight razor: VanDyke Brown lines, heavy glaze of Teddy Bear Tan, but this time I used a wash of FolkArt Coffee Bean. Brushed off that last wash on places to give it more of the uneven tone that wood grain has.

Back of the robes delivered what I wanted on a first coat, though it obviously needed some shading to bring out the "swanky" velvet sheen I wanted.

Had to put him on the base just for sizing him up and make sure I'm still headed in the right direction.

With that confirmed, it's onto the finer details.

Friday, September 25, 2015

Collodi 2: More Puppet Friends Crash Home Base

So with Reaper's hankercheif ghost done, I knocked out two more to crash the party on Collodi's base: the Reaper "doll with knife" from the Familiar IX pack and Reaper Gingerbread Man from the Familiar IV pack.

First one up was a personal fave mini of mine. I really wanted to paint this guy a while. Could have gone for a wood tone, but I was more partial to an old discarded doll look. 

Primed white, black wash. First coat was a glaze of FolkArt Cappuccino, which has a very fake orange-y tone to it. I wanted a "not real" look to it so that was fine. Then I did some heavier coats with Reaper Tanned Skin and Tanned Highlight. Cracks in the head were painted on, inspired by some creepy dolls I googled.


Couldn't let the straight razor have a plain black color, since I thought most older ones had a wood handle. So I painted in the wood lines in Van Dyke Brown and did a heavy glaze of FolkArt Teddy Bear Tan. 

Next up was psycho gingerbread man. This guy was a simple paint, color scheme based more on the Shrek character "Gingy". Just as funny, but more insane looking.

Not ironically, his main color was Reaper Ginger Cookie. The wood lines on the rolling pin were painted on with Van Dyke Brown and a heavy Delta Ceramcoat Cinnamon glaze (don't leave home without it).

I liked this method of "painting in" the wood grain pattern. Good timing since I needed to do something to help Collodi's look along.

Sunday, September 6, 2015

Collodi 1: Prepping the Base

Collodi!
Finally got the Master of Puppets box set in. Got him assembled, got him primed, got some black wash on him. But before I began painting the Neverborn leader who's inherited the namesake of Pinocchio's author, I wanted to do something with his pose. I love it, but as my painting buddy pointed out, it kind of looks like he's casting a spell.

Maybe that's appropriate for him, but I liked making it more plain that he's a puppeteer. That would obviously involve getting a puppet on his base. So I could just have a Marionette share the base with him, but gluing one on there means you can't separate it out to use in a game.

So I got the idea of just having a little magnetized piece you could pull out and swap in similar sized piece with a doll mounted on. Suddenly using some of the Reaper dolls I'd acquired started to fall in place.  

Game-wise, Collodi has to sit on a 30mm base. So I filled one to the edges with a layer of green stuff and dropped a rare earth magnet against the lip.

Knowing Collodi would have to share a small base with another figure, I made his area of the green stuff thick so he could sit high and back a little. Then I used an Instant Mold made from an Enigma "tavern" wood base.  Carved a little space out where the magnet was using some Reaper minis to juse the width. I did this because I knew I'd never be able to cut off the standard Reaper bases without completely messing up the mini - namely the "kewpie" doll golem and the gingerbread man. Let it harden and then minor filing so the small bits could slide in without scraping. Also drilled two holes where Collodi would sit on the base.

The more I thought about interchanging one puppet the more I relished the thought I could switch out more than one puppet. That means more little bits are needed, to mount the puppet.

The easiest way to create the smaller bits was to get put green stuff on a little plasticard, and slide it into the notch. Vaseline is needed around all sides of the notch so it doesn't stick there. (When the shaping is done, rubbing alcohol will remove the Vaseline). 

From here, you just reapply the mold. Some of the green stuff sticks to the side. A sculpting tool / toothpick helped to separate the small bit out and shape it back.

Let it harden. Filed as needed. Then I Dremeled out a groove on the bottom, cut a little paperclip piece, and superglued it to the bottom. The magnet now has something to grab. (Stupidly forgot I had to do the same with Reaper dolls I didn't cut off the base because the pewter alloy isn't magnetic. I am a very poor scientist.)

Very pleased with how close I got the color matching on the wood. Still only three freakin' colors after priming white: FolkArt Mushroom, a midtone grey (think I used Anita's Grey), and my FolkArt Van Dyke Brown wash. But I discovered the best technique by accident. I applied a heavy Mushroom glaze over the boards, but felt I over-applied it.  So I soaked it the excess with a clean brush but then took off too much.  I was disappointed at first, but once it dried I realized it matched the lighter near white boards perfectly. Going to use this "glaze and remove" process here on out for wood bases.

So I started with the Reaper "hankercheif" ghost from Familiar pack VI (listed as "sock doll" on the onine store). I wanted to make a base that he could sit on. Mirroring my process with Collodi, I applied green stuff up to the lip of the base with a magnet (this time in the middle though). Let that harden, put the small bit, applied more green stuff around it, used Enigma mold, and painted. 

Hadn't discovered the "glaze and remove" technique yet. So the color scheme doesn't match perfectly like on the Collodi base.

Here's the unpainted Collodi with the Reaper hankercheif ghost swapped in. 

Saturday, August 22, 2015

The Wicked Dolls

So I've mentioned in my "lump golem" post that I'm looking into doll minis... Mostly due to the release of the 2e Collodi crew.

I had a pack of first edition Wicked dolls that I thought I'd start with. I wanted to have the bases prepared do first, I had to decide what environment they'd be in. I figured Collodi would be using dolls and marionettes on a stage so the base should be inside rather than outside. 

I wanted to do some true color matching on the Terraclips Building set (rather than the Street set, which i've almost nailed). When I tried to mimic this with Teddy, the wood had too much red in it. This time I used a FolkArt Linen and Mushroom as the base, and just used a heavy FolkArt Van Dyke Brown (like a Walnut brown) wash.  I used a Wyrd Orphange 30mm insert, and found a Buildings square with a care in it.  Here I used Reaper's Orange Brow and a little FolkArt Yellow Ochre mixed in. The carpet patterns were just a heavy Van Dyke glaze. Very pleased with the results. 


Primed the dolls white, black wash for separation.  Prime colors I decided were going to be bright, fun colors - like a clown suit. So a lot of Reaper HD colors got used here: Saffron Yellow, Dragon Blue, Ice Blue and a sample paint that I think is Moth Green.  The purples were Anita's Hyacinth, and Violet.  

One small disappointment on the models themselves: the stitching was a little inconsistent. Most of the pattern was recessive, with nothing raised to paint string or thread. So all you can leave is a black wash border that implies stitching.
I also decided that one of the dolls was going to get stripes. Dreaded, dreaded red stripes...
Decided I was going to make another attempt on Tamiya clear red for a little bloody handprint on the rightmost doll and the bloody footprints on the floor for the leftmost doll.
My grandmother always had a sewn clown doll that was a baby blue with white polka dots. We'd come to her house and it would be sitting on the bed right under what had to be the most unsettling picture of baby Jesus with the eyes that look right at you. Can't recreate the Jesus pic but can borrow the clown for it's color scheme. It's something that would probably give my sister nightmares for days.
I think polka dots trump stripes in the PITA factor.
After getting the spacing right on both sides, I told myself I was done. Following day, I took it all back and tortured myself into trying to get shading done right on this last guy. But in the end, I feel like I got all three done in a good way.

Wednesday, July 22, 2015

The Rag Doll 1: The "Lump" Golem

A couple months ago during my miniature acquisitions, I was looking at doll minis.  Wyrd's Puppet Wars have a ton of great options, but I didn't want to make the investment in another whole game I'd have to catch up on painting.  There's the Wyrd Collodi crew, which i am getting now...but at the time it wasn't available. Of course, there was the Voodoo Doll totem for Zoraida which I also bought and have since finished.
I started looking on Reaper's site to see what doll figures they might have, when I realized there was a "rag doll" figure included in the familiars that came with the Bones 1 set.

Excited to realize I already had him, I hunted through my Bones for the familiars.  Next to all the others, he looked like an amorphous blob holding a bouquet and a knife. (That's him on the far right.)
So I looked at the metal version online, and a saw a pile of Bugles stabbed with a knife instead. 
So I painted him white and ran some black wash over him to get some details to pop out.

Ugh. Maybe the back looked better...
Nope. He looked like something off of CakeWrecks.
I couldn't discern what was going on here. So I gave up and bought the metal version off Reapers website online to see what exactly was going on with this guy. When I got him, it all started to make sense.  
He's a little Raggedy Andy marching forward holding a dagger with two arms - dragging a pouch behind him.
I'm starting to like this guy but it's really important to understand what the hell is going on with him.
First, he's in mid-march stride - so one foot is up, the other is down. 

Second, the right arm crosses his chest and his two-fingered "hand" is resting on the knife hilt. But there's stitching between the wrist and hand, plus a mold line that makes this confusing to look discern a bit.

Third, he's holding the knife with two "hands" so you can see the two digits and the thumb from the other side.

I'm starting to like him.  But I haven't started painting him yet.  Just to give a perspective of the scale any painter is up against - here he is next to a dime.

Sunday, May 24, 2015

Terraclips: Dead yet still alive

I started using Terraclips Building and Street sets for a city campaign I was running.  I grew attached to them for their flexibilty and low impact on storage. In fact, they sort of helped me make the jump into playing Malifaux. 

I always wanted to get more of the Street set but kept putting off until finances got a little better. I noticed last Xmas the the Wyrd site was clearing them out. Didn't think much of it.  I had them on my Amazon wish list. Then this year, when I wasn't looking, they became unavailable online.  I blinked and the whole line was dropped.  I freaked out, ran to my local FLGS and bought out what was there. 

A bit of a shame. The design was extremely versatile. It was perfect for a tabletop RPG.  Being able to put miniatures in a house where you could pull out a wall, or have some on one level while others on another made the abstract much more real. 

For wargaming, it was pretty good.  The big caveot I found was the thing that made Terraclips great for RPG's - multiple level buildings where you could take the roof off and resolve a separate fight from the main group - could slow down a Malifaux game. To get a miniature to the top level of a building could take an entire session. The best way to make it work was two have a two level platform or bridge, but little-to-no interior interactions.  

Here's an example of Terraclips in a Malifux game that I thought worked.  The idea was two buildings with second floor platform and railing you could run through the house to get to... or run between two houses or up a bridge / staircase to get from one side to the other. Here I used the two ramps to have a fountain in the middle. Note: the board doesn't include the 6" deployment zone.


The middle could be swapped out for something else. Here I used more an elevated walkway.  It worked out well, as long as you clarified you could not run underneath the platforms.


Here's one last set-up with the middle clear and ladders where the platforms used to be.


I'll do a post soon where I show how well it worked for RPG's.

Tuesday, May 12, 2015

MCFA Show 2015

Haven't posted in a while. Have been painting - just not anything I've been proud enough to post.  :-(
I DID however attend the Miniature Figure Collectors of America show in Philly today  to get quick peek at some of the entries.
Mainly what l wanted to see was... if I took a picture with this camera-phone, would I get a picture that looked like the pics on coolminiornot, wyrd or reapermini... or would they look as unfinished as mine.
The answers I found:
1) most historical minis are at a much larger scale than I paint. So there's a lot more detail there
2) the halogen lights of the convention center worked for some quick but well-lit shots.  My house is always unnaturally dark
3) the details are a lot better than mine but I bet I could eventually get as good as some of the guys there. It just a matter of add pending several hours on that last coat of whitish sheen.
Some of the pro's though... jeez, they we're crazy good.
Mostly I took pics of the 28 mm size I'm used to painting as opposed to the 54 mm historical scale.   
A Malifaux mini! Jim Richey did a nice job on this one.

Wish I grabbed this painter's name.  Really impressive purple skin tone work.

I had to grab a snap of this Reaper Pathfinder mini just because one of my fellow party members is using it in our current campaign for his paladin.

This one is about 54 mm scale.  But zoom in on the detail on that robe.  It's incredible.

Tuesday, January 20, 2015

The Carver, Part 1

So I'm going to blog a bit about scarecrows because I have a lot of them on my hands.  Specifically:
I'm starting with The Carver though, because I wanted to knock out the ones that need to be assembled first (. ..and plus I wanted to try Night of the Carver scenario for a game).

He came in a single plastic sleeve where you had to cut him off sprues.  
What threw me off a bit was he came with two heads: a pumpkin head, and a cloth one that looked frighteningly like The Scarecrow from the Chris Nolan Batman series.

I loved both so checked in with the family. My wife in particular insisted on a gourd was way better. So Peter Pumpkinhead it is.  Clothface is just going to have wait for a kitbash.


What's most interesting to me about the mini is this subtle detail of how he's still attached to the pole he was hung on. Its like he got he got his hands free from the pole, but not his upper body.  So he forced himself off by breaking the base.  Now he's free to walk but still stuck with a scarecrow cross on his back.

This time to prime I decided on combining the Black prime/white dry brush and White prime / black wash techniques. I did a Grey Prime, black wash, and drybrush white.  I was stunned at how well it came out.

I used this same priming method for a Janey Blankenship from Reaper that I planned on using as a proxy for a Pistolero de Latigo.  I was stunned at how well it came out.  Its almost as if I tried my hand at monochrome for the first time.