Saturday, November 29, 2014

The Zoraida Proxy, Part 4: Waldgeists for... Waldgeists?

After playing a shoot-out with Bad Juju and silurids, I realized my crew needed some variance. Waldgeists caught my eye. I really loved the new 2e look and picked them up in a GenCon early release.  This also means in trying to put a crew together without buying more miniatures, I ended up buying more miniatures.  So sue me.

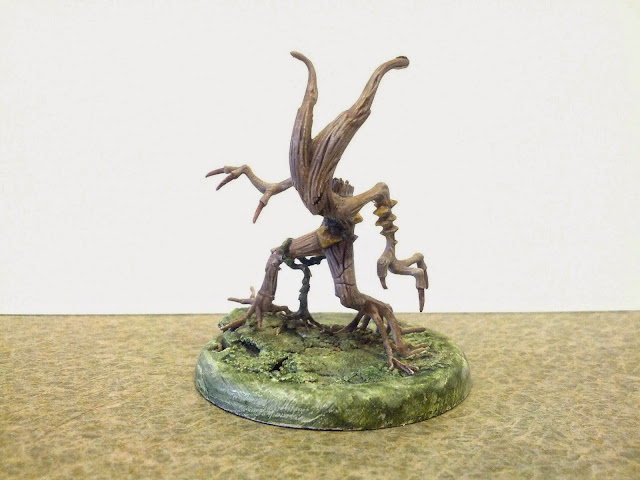
These guys are all plastic.  The detail is incredible and the plastic quality is great (unlike board game figures, like the aforementioned murlocs).  But holy crap, Walgeist #1 - great look but those vines are sooooo tiny. That vine running around his right leg? It's actually four pieces - two of which are the root systems.  Don't think you are going to pin any of this together.  Super glue and two-part epoxy is your only hope.
Still, the sculpts are a lot of fun.  I thought the brown bark of a weeping willow would have the right color scheme for the swamp. But some quick searching proved me wrong: I really wanted a bald cypress color scheme, especially when you consider the tree has projections that shoot out of the ground called "knees".  Rather appropriate for the figure's Germinate ability.

My main coat was FolkArt Barn Wood.  It's a grey color but has a warm tone to it - probably closest to Reaper Aged Bone.  To give it some variance, I did a lot of FolkArt Medium Grey, Light Grey and Fawn glazes with Van Dyke Brown washes.

The wood ear-type mushrooms I was torn on between a deep red or a yellow-peachy.  But a couple quick searches show that more commonly the kind of mushroom on cypress trees in the swamp is yellow ochre. So a lot of FolkArt Yellow Ochre and Buttercup with Reaper Ivory Tusk highlights and FolkArt Honeycomb washes.

I did Waldgeist #1 last.  As you can guess from my annoyance above, I was not very successful in getting his "rooty" feet an even, flat footprint.  He had the overall look of pulling his feet out of the ground and stepping over a small hill or bump.  Unusual... but I could make it work.  (I figured if he was stepping up, the idea that there was skull underneath his one foot didn't make sense.  So no hidden skull.)

The catch was I knew I had to make the horizon of base fit the footprint of the mis-aligned figure.  Building up the base with cork or sand seemed too tedious.  The better option would be to apply a soft substance to the base, press the figure slightly to make a "footprint", let the base dry and then glue the figure in later.  I was too scared to use green putty/epoxy; it's too sticky and I was afraid if I pressed too hard, I'd pull apart the figure when I retracted it and would have to re-glue.

I used spackle instead.  Apply the spackle to the base, press the figure in, and brush over with good ole Elmer's glue.  One half of the right foot was still hanging mid-air (along with an accompanying vine which looked weird in mid-air).  So I just let it dry and add more underneath the "dangling" area a few hours later.  This worked surprisingly well and quickly, especially for a figure I was sure was going to give me problems.  He does look like he's putting effort in mid-stride.

Has anyone ever said that Waldgeist #2 looks a little like Groot with a beard?  Like Groot's quiet uncle.  No?  Well there I said it.  Pretty much the same color scheme but with a dot of FolkArt aqua in the eyes (this detail will probably be more obvious when I take some better pictures).


Waldgeist #3 has a little interesting moss detail.  Color scheme was:
  • Base: Reaper Mossy Green 
  • Wash: Reaper Mossy Green with Reaper Christmas Wreath 
  • Highlight: FolkArt Babyberry


His base looks really crowded - and it is, thanks to some swamp cattails I picked up at the local train shop.  Plus it ended up fitting with the tray really nicely.  The tray will be another post, as soon as i get my camera to work.


Tuesday, November 25, 2014

The Zoraida Proxy, Part 3: Baba Yaga for Zoraida

My old DM from when I was a teen played Baba Yaga as one of the prime movers and shakers of his world.  There was an old Dragon magazine with an adventure called "The Dancing Hut" by Roger E. Moore that was a keystone. Since then I have had a love for the old crone.

When Reaper Miniatures came out with a mini for her, I ran to my FLGS only to find that they'd just sold out.  (Ironically, the person they'd just sold out to was the DM of my current gaming group who beat me by about two hours buying the last figure.)

So one of my other friends in our gaming group picked her up for me as a Christmas present.  She'd been on deck for quite some time for me to get to.  Eventually I needed a break for undead women on my Seamus crew, and pulled her out.

She came with a pile of sticks to attach to her back, but I didn't feel that fit her for me.  I understand that is part of her legend, but it was too pedestrian for the way I see her.

The figure has a lot of room on the dress and shirt to do some artistry... but I don't see Baba Yaga wearing something ornate.  So I cheaped out here.  Instead I focused on trying something different with the skin.  A good image reference made me want to try a liver spot appearance to the arms.  After the first coat of Reaper Tanned Skin, I went in with a dark grey a dotted up her arm and face in some spots.  Afterwards, I did a glaze of Reaper Dirty Grey to bring out the pallid skin look.

It came out... eh.  Didn't get the effect I wanted, and glazes covered the spots almost completely instead of muting them.  Not to mention there is a really obvious flash line I missed on the left arm which popped out after the first wash.  I couldn't file it down because the pin on the arm was not strong enough.

The position of the figure is a different story.  Can't remember if it was the way I glued her or the way she came out of the package, but one foot was lower than the other - like a bum leg.  Might work for realism, but sure looks awful when basing the figure.  So I decided to have her stepping down.  Keeping consistent with the Terraclips Streets terrain, I thought of an appropriate character image for Baba Yaga.  She's stepping off the crumbling cobblestone of the city and back onto her home territory - the earth - stepping back into woods or the swamp.... leaving destruction in her wake.

That made the struggles on this one worth it.


Saturday, November 22, 2014

The Zoraida Proxy, Part 2: Bog Elemental for Bad Juju

Okay, I did almost nothing to the Bog Elemental other than cut him off the old base and stick him on the new.  But how could you blame me?  Of all the original WoW minis... this one and the Goblin Shredder were the best paint jobs.  And the sculpt here is really great. (Note: this came from the WOW mini game from Upper Deck, not the WOW Board game from Fantasy Flight where the murlocs came from).

I did do a few touch-ups:
  • A lot of de-glosser to get the shine down.  
  • Never understood why he had one brown thumbnail and one green one... Both are brown now.
  • Evened out the wash and the vine color.  
  • A little drybrushing here and there.
I do miss having the voodoo dolls that the M2E figure has - that's a really cool touch.  But I really wanted to play Bad Juju the Mire Golem without delay.

The base I did similar to the murlocs - some green stuff, a little ruined cobblestone, Vallejo Still Water, static grass and tufts from The Army Painter.  Don't think I mentioned that on the murloc post.


Quick update: after I posted this I realized the flowers on ole Swampy's back were a sloppy mess.  So I went back and touched them up with some Reaper HD paints: Fireball Orange, Rusty Red, a wash with Crimson Red, and some highlights with Golden Yellow.

Saturday, November 15, 2014

The Zoraida Proxy Part 1: Murlocs for Silurids

I had just finished painting the Perdita crew and was painting Seamus crew, with Marcus on deck for the distant future.  I really wanted to try another crew, but at the rate I finish  painting figures, I just knew it would be another box sitting in my drawer for at least a year. So I started looking at the minis I had, and realized I could probably proxy in a Zoraida crew.

First, I subbed the silurids with murlocs.  I had a bunch of pretty awesome plastic figures from the WOW board game.  I'd painted these back when I was exclusively using Games Workshop paints, didn't care too much about extensive basing, and hadn't discovered de-glosser.  

I proxied them for a  Malifaux game vs gremlins. While I won, I realized the bases were less than 30 mm which really shortchanged the silurid movement abilities. Also this is some of the first bases I ever worked on... and I knew I could do much better today.

Grabbing some of the ones where the paint job was a little better, I grabbed some 30 mm bases, put down a green epoxy base. Terraclips Streets tends to be my default terrain, so I wanted to put a little cobblestone in the marsh to give it a slight transition - sort of as if the swamp had taken over an abandoned section of the city.  I now use a template I got from miniGIRL for almost all my cobblestone bases.
NOTE: Got a little too much Vallejo Still Water on this purple guy as it was my first attempt using the product. The scotch tape around the base doesn't work if you have a rounded lip.  It just leaks out everywhere.

The disadvantage of plastic minis is definitely flash lines.  They are a pain to remove, easy to destroy fine details by using too much force, and nigh impossible to resculpt.  The advantage is small leg/hand adjustments after the figures have been painted.

Each murloc has this "sumo wrestler" stance that looks funny and not very threatening when a group of them are set side by side. I found the best way to vary up the positions was to make one leg go back to make it look like it was running.  The bent leg will slowly bend back to its original position but it is possible to get the position you want.  It's all up to the placement and angle of your pin, overbending when ready and super-gluing to the base before it bends back.  Testing hole placement before gluing is key.  The pin for this guy ended up being in the balls of the toes for one of the feet.  Once I got the holes drilled in the base, I would overbend the leg and quickly superglue it until I got the position right.  And I glued one of his arms to his knee...
And this blue murloc, I'm pretty sure I put the pin in one of his toes.  He really looks like he's in mid-leap.

NOTE: Cell Phone pics

One thing I forgot to state... all these pictures so far are being done with my camera phone.  Final pics will be done with my Panasonic Lumix with the micro setting... as soon as I find the freakin' battery charger!

Saturday, November 8, 2014

...and this is.... what?

Social media sites sometimes irritate me.  The character limitation on posts is annoying, you upload one pic at a time, and defacto editing (e.g., the order of posts) is nigh impossible.

I've wanted to post pictures and some "how to's" on mini painting and gaming works I've done. But the social posts lack the details, they aren't easily searchable, and there's not a lot people on my social sites that would give a damn. 

Eventually I realized, what I'm looking to do is post a blog.  So... I came up with malzowowper...

(umm... what?)

Malzowowper is an almagamation of: 

  • Malifaux
  • Zobeck
  • Warcraft*
  • Reaper (the miniature company)
And if I could have squeezed Pathfinder in there... I probably would have done that too.  But Malzowowper PF sounds like someone getting snarky with me.  (Malzowowper??  *pffff*)

Anyway off we go...  

I love the world of WOW. As a result, I've gathered some cool figures/minis and flavor things along the way.  But anyone looking to find anything regarding the current WOW game may not find anything of value here at all.  Maybe some day I'll post a bit on that.