Showing posts with label terrain. Show all posts

Wednesday, July 31, 2019

Trees and Contrast Paints

If not obvious already, I love using terrain in a wargame and RPGs with miniatures.

But I didn't always have this appreciation. Most RPG's I played in the 80's and 90's used "theater of the mind" to visualize spaces. This style of play relies on the game master to communicate the placement of all the relevant pieces in an encounter.  (Map drawing helps too.) 

But after having played with a group who frequently uses terrain and miniatures, there's an immersive experience that prevents me from going back to the theater of the mind.

Mini painting soon became a creative outlet - as I wanted to re-create the same environment my gaming group had. 

Then it became an addiction.  Seeing a unique figure plants the seeds of encounters and adventures. It even forces you to pick up more mundane objects.  I'd purchase figures I might not use, but looked too cool to pass by.

Then it became a storage concern with the advent of Kickstarter and the board game revolution.  Decent unpainted plastic minis came cheap.

And now, I'm reflecting on all this hobby consumerism gone wild.  I'm refocusing on its personal importance and artistic value. 

It's also partially because I inherited a small terrain legacy.

I had a friend who I knew to be a gamer. We'd chat about figures we picked up, but where I was focused on grabbing one or two figures - sweating over which highlight to use - he went the pre-painted miniature route. Then pre-painted terrain.  That eventually became 3D-printed terrain.  His mission was to create the ultimate campaign.  Four 3D printers ran non-stop making houses, towers and trees.

But he passed away before he got to run his ultimate campaign.

His family was looking to clear out his home. No one - not even gaming stores - wanted his unpainted 3D-printed stuff.  I grabbed all of it before they hit the curb.

Conflicting feelings car-crashed in me:
  • Responsibility - I cannot let my friend's work go unnoticed or unlived.  There's a unrealized dream behind every tree he printed. 
  • Panic  - There's not enough time and space to paint all his stuff, much less complete my own surplus. 
While I have come to terms that I have some auction-purging to do, I will note that Games Workshop's Contrast Paints came at just the right time.  The "one coat and done" has a great appeal to knock out some of my new acquisitions.

And since I had a lot of new trees, it was time to start there.

First - white primer.

For my First Trial, I used five colors from the Citadel Contrast paint line. These colors are dark to light and I used them from bottom-to-top: Dark Angels Green, Camo Green, Ork Flesh, Militarium Green, Plauguebearer Flesh.

Realizing that these paints are very thin, I heavy-loaded the brush to be able to move the paint around on the figure to do some wet-blending.  But starting from the bottom up, the paint was constantly dripping down and collecting under the tree and running on to the trunk.


With washes, you can mop off the run-off with a clean brush. But with Contrast Paint this made smears everywhere.  The only chance to really save other areas that get spilled onto is to catch the paint before is slides into the area - which defeats the purpose of saving time.

So I learned something very important with Contrast Paints:
  1. make sure any wet blending is done above an unpainted area so you paint over with white or grey again
  2. most importantly - start from the top down

So here we go top down starting with Plauguebearer Flesh...

... then Ork Flesh...

... some wet Blending more Plauguebearer Flesh in with Ork Flesh...

... Militarium Green as a wash for top area...


... then Creed Camo to transition into darker areas...


... and finally Dark Angels Green with no run-off!

So far, very good.  Onto Bark work. (We will not use brown.) I have three examples.  One starting with Grey Primer with Skeleton Horde.

Another using White primer with Basilicanum Grey. 

Finally, White Primer with a quick base coat of FolkArt Barn Wood and then Basilicanum Grey 

Final part bases.  Old bright brown - Delta Ceramcoat Autumn Brown with a Contrast paint Cygor Brown


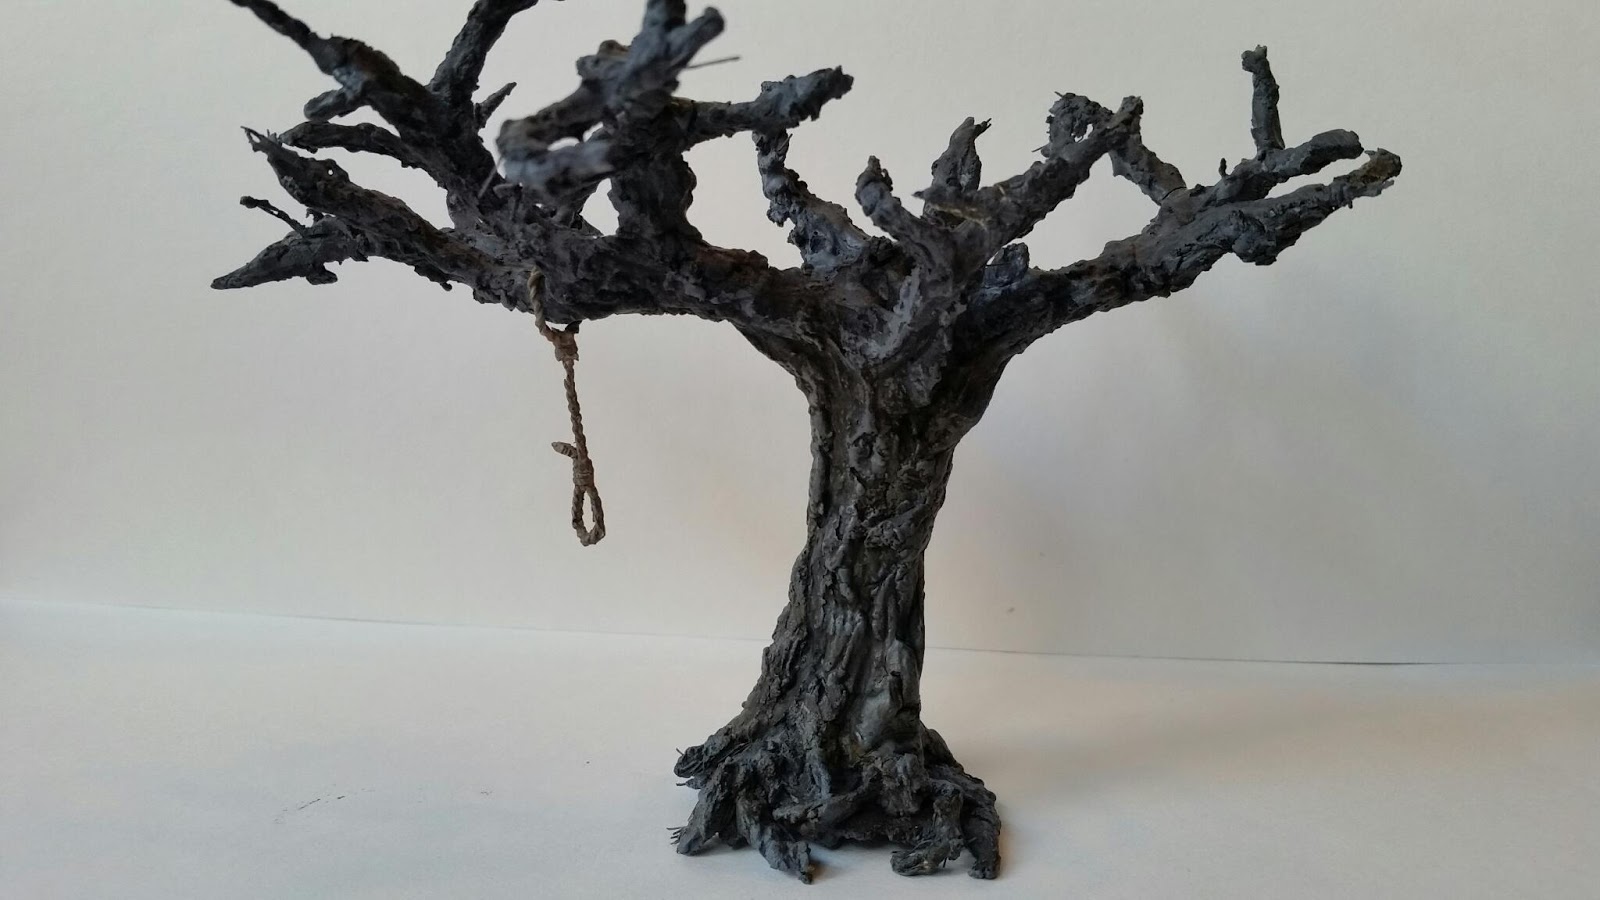
Final trees before adding any flock on the base.
Grey Primed (probably my favorite).

White Primed with no basecoat on the bark. Has almost a birch look to it.

White Primed with Barn Wood basecoat on the bark.  The not-quite-done print job on this showed a lot of lines on sculpt. 


Overall this is an expensive way to paint this.  But the speed combined with detailed look is just what I need to get things done!

Tuesday, January 5, 2016

The Hanging Tree 2: Bark Is Not Brown

I originally wanted the tree to have a dead look to it, which from what I've seen, meant no brown.  But when I looked at what I had at the close of my first post, which had no brown, I wasn't happy. 

So with my very grey-looking tree, I used some dry-brushed in some FolkArt Mushroom and then Barn Wood on top.  I also washed in some more black, FolkArt Coffee Bean and FolkArt Fawn.

Still not happy.  Now it just looked like a stone tree.

So I looked up a few trees that were actually used as gallows trees.  Running this one picture through Reaper's Power Pallete (such an awesome tool) - yes, the greys are there, like the Ashen Grey I used - but it's juxtaposed with strips of olive and mossy greens.

Meanwhile running this picture of another in Texas the undercoat has very dark browns - like in a brown liner or walnut brown.  But where the light hits is a dark muted greyish-purple, which Reaper notes it as Dark Elf Shadow and Dusky Skin Shadow.

My painting buddy and I were talking about the color palette trees. During the winter season, I see a lot of leafless trees on my walks.  We both observed that - despite all your crayon drawings as kid to the contrary - most trees are not brown. Or at least not the bark of most tree (pine trees excepted).  The outermost layer of bark (called "cork") is usually grey. Couple layers under that is secondary phelloderm, which is more brown.

Eventually I got it right or close to right.  Its all about washes. Rich brown washes in the underside shadows, mossy green washes on the side hidden from the sun, and some final very wet black wash to end.  A little dove grey highlights at the top, but otherwise its all in the wash.

Here's the backside...

The Hanging Tree 1: Framing It Up

So in Malifaux, the Hanging Tree is an iconic landmark to warn visitors and immigrants to obey the law or dangle from a rope. It's the third thing travelers on the train see before pulling into the Malifaux. There's a cool official mini that Wyrd sells on holidays, and I've always been tempted to buy it, but the price tag is a big turn-off.
Since I've been reading more terrain blogs and watching some videos, that cost-effective voice perks up and says, "I could do this myself."
So here goes my Xmas 2015 experiment.
I'd kept and old extension cord ever since I saw this YouTube video on making wire frames for miniature trees.  So one game session I stripped it and made a tree with one long arm perfect for a rope to throw around.

Knowing I had to apply wood filler, I applied some masking tape so it had something to stick to.  Here's a shot of the the taped up frame with some putty applied to the trunk. 


I'd tried some white wood filler from a tube on another mini but nothing got the wood feel quite like this stuff from Elmers. It's pretty amazing how little you have to apply. But you really need to make sure you get some watered down PVA glue or wood glue to harden it up after it dries.  It crumbles really easily and moving it around is a mistake.

Slowly adding filler up the branches...

Filler progressing up the tree.

At this point, I realized some of those branch ends had to go.  Time to trim them up.

As to the base, I added some spackle to get a simple impression of the trees underside.  Spackle works for that dirt feel (though like the wood filler, it needs some watered down PVA glue to harden it up).


The Hanging' Tree sits by the entryway to the city so I wanted to get some city cobblestone underneath - to get that  impression this evil tree is bursting up over the city, unable to be subjugated. The green stuff was used for  cobblestone  (once again, using miniGirl's template). Spackle was used for the dirt.
Applied my Terraclips City color scheme, and some Burnt Umber for the dirt color.
Had to break to hangman's rope into two sections: the rope around the tree and the noose. For the noose, I used "InstaMold" to copy the noose from the Malifaux Bayou Accessories pack.For the rope, I straightened two paper clips and then twisted them together to create the rope hanging from the branch.

I primed the whole tree section with Army Painter Uniform Grey, and did a little black wash but I decided against drybrushing white.  Most dead trees seem to have a strong grey hue so muting that as the undercoat I felt would undo a good start.  The rope I gave a light brown coat - combining Linen and Coffee Bean (FolkArt).
I eventually decided on using Reaper's Ashen Brown from their HD line as the main coat. Its a very muted brown with a hint of purple to warm it up a little. I watered it down to a thing glaze and gave two coats. The first went everyehere. The second was more selective, leaving some if the knot holes untouched for the grey to come through.

More to come.