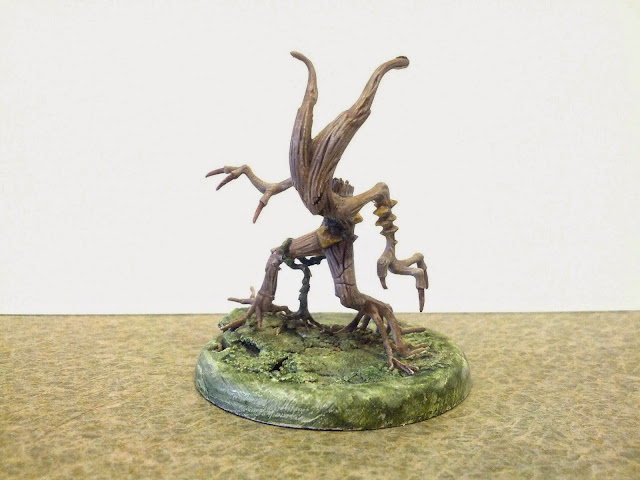
After playing a shoot-out with Bad Juju and silurids, I realized my crew needed some variance. Waldgeists caught my eye. I really loved the new 2e look and picked them up in a GenCon early release. This also means in trying to put a crew together without buying more miniatures, I ended up buying more miniatures. So sue me.
These guys are all plastic. The detail is incredible and the plastic quality is great (unlike board game figures, like the aforementioned murlocs). But holy crap, Walgeist #1 - great look but those vines are sooooo tiny. That vine running around his right leg? It's actually four pieces - two of which are the root systems. Don't think you are going to pin any of this together. Super glue and two-part epoxy is your only hope.
Still, the sculpts are a lot of fun. I thought the brown bark of a weeping willow would have the right color scheme for the swamp. But some quick searching proved me wrong: I really wanted a bald cypress color scheme, especially when you consider the tree has projections that shoot out of the ground called "knees". Rather appropriate for the figure's Germinate ability.
My main coat was FolkArt Barn Wood. It's a grey color but has a warm tone to it - probably closest to Reaper Aged Bone. To give it some variance, I did a lot of FolkArt Medium Grey, Light Grey and Fawn glazes with Van Dyke Brown washes.
The wood ear-type mushrooms I was torn on between a deep red or a yellow-peachy. But a couple quick searches show that more commonly the kind of mushroom on cypress trees in the swamp is yellow ochre. So a lot of FolkArt Yellow Ochre and Buttercup with Reaper Ivory Tusk highlights and FolkArt Honeycomb washes.
I did Waldgeist #1 last. As you can guess from my annoyance above, I was not very successful in getting his "rooty" feet an even, flat footprint. He had the overall look of pulling his feet out of the ground and stepping over a small hill or bump. Unusual... but I could make it work. (I figured if he was stepping up, the idea that there was skull underneath his one foot didn't make sense. So no hidden skull.)
The catch was I knew I had to make the horizon of base fit the footprint of the mis-aligned figure. Building up the base with cork or sand seemed too tedious. The better option would be to apply a soft substance to the base, press the figure slightly to make a "footprint", let the base dry and then glue the figure in later. I was too scared to use green putty/epoxy; it's too sticky and I was afraid if I pressed too hard, I'd pull apart the figure when I retracted it and would have to re-glue.
I used spackle instead. Apply the spackle to the base, press the figure in, and brush over with good ole Elmer's glue. One half of the right foot was still hanging mid-air (along with an accompanying vine which looked weird in mid-air). So I just let it dry and add more underneath the "dangling" area a few hours later. This worked surprisingly well and quickly, especially for a figure I was sure was going to give me problems. He does look like he's putting effort in mid-stride.
Has anyone ever said that Waldgeist #2 looks a little like Groot with a beard? Like Groot's quiet uncle. No? Well there I said it. Pretty much the same color scheme but with a dot of FolkArt aqua in the eyes (this detail will probably be more obvious when I take some better pictures).
Waldgeist #3 has a little interesting moss detail. Color scheme was:
- Base: Reaper Mossy Green
- Wash: Reaper Mossy Green with Reaper Christmas Wreath
- Highlight: FolkArt Babyberry
His base looks really crowded - and it is, thanks to some swamp cattails I picked up at the local train shop. Plus it ended up fitting with the tray really nicely. The tray will be another post, as soon as i get my camera to work.


No comments:
Post a Comment