Showing posts with label Gremlins. Show all posts

Saturday, September 7, 2019

Warpigs: Gathered in their Marshes...

Painting pigs usually always means "pink".  The whole pig - painted pink.  But looking at various pics of pigs - while they have a pink or "pinkish" skin - there's a fine white fur that makes the pink more fleshtone.

So taking the lessons learned from the Swine Cursed - this calls for undercoating and glazes.

Warpig Color Scheme
  • Main Skin - Undercoat: Reaper Maiden Flesh mixed with Reaper HD Entrail Pink, Base Coat: Heavy Glaze of Reaper HD Fair Skin Shadow and Reaper HD Maiden Flesh, Highlights: Thin Glazes of Reaper HD Caucasian Flesh, Reaper Maiden Flesh, and FolkArt Linen
  • Hooves - Base: FolkArt Butter Pecan with dark brown washes (FolkArt Walnut Brown)
  • Eyes - Base: Reaper HD Bright Red
  • Fur - Autumn Brown with Reaper HD Golden Brown highlights

Having played a game or two running the Ulix and his pig crew, I realized I needed two warpigs for some heavy hitters.  At the time I bought the figure Malifaux only had one sculpt.  Since there's no variance in the sculpt itself, I needed to be able to distinguish the one from the other.  (It makes a huge difference in preventing mistakes mid-game.)

So I decided one pig would NOT have the pre-packaged gremlin with banjo riding him.  The other would.

Warpig 1 had the rider.  Primed white and black wash for separation.

First coat was all pink.  He really looks like a hot dog here.


With the first glaze of fleshtone you can already see the more natural pig skin color. I didn't take good notes here, but I think I used a warmer skin color with the first pig - like Fair Skin Shadow or Tanned Skin.


Another snap after more highlighting.

Warpig 2 needed to have all traces of the gremlin rider removed.  Some Dremel work handled that nicely.  Of course afterwards meant some green stuff work.

Primed and separated below.  I was pleased with how well my green stuff work came out.

I missed taking a snap of the undercoating of pink for Warpig 2.  But below you can see the first heavy glaze.

Putting him on a nice muddy base. 

Final Thoughts:
Very very happy with running an undercoat for painting pig skin tone.  Big success. 

Wish I could remember specifically was I used for Warpig 1 on the first heavy glaze (Reaper Fair Skin? Fair Skin Shadow? Tanned Skin?).  The yellow in the color makes an obvious difference in the tone below.  Warpig 2 looks a little cold in comparison.

Also I could have used a dark brown for separation on the ears rather than black wash.  Separation on the ears and tusks look a little harsh. Still table top ready!


Thursday, August 15, 2019

Swine Cursed 1: The Gremlin-Pig Lycanthrope

Werewolves scared me as a kid.  I didn't need to see An American Werewolf in London in theaters as a kid because the commercials alone kept me up at night.  I was only ten when it came out, so I'm sure an analyst would point out it was all my fear of the inevitability of adulthood.  Or perhaps more accurately, the dread of puberty.

But when I think on it, the real scare was always the loss of control over your body.  Disease doesn't tap that fear so much as the loss of your mental capacities to control your body, your actions, your words -- even your thoughts. In a minute, your mind has kicked out your personality like a bad renter. Or worse yet some small subconscious flaw has back-doored an outside influence to wrest command of the entire ship.

It sort of compliments the imitator fear in that you fit right into the new world that the Body Snatchers built without your conscious acknowledgment.

You secretly wanted this.  That's why the lycanthrope imprint took hold.

That said, the Swine-Cursed isn't a scary figure but an homage to the trope with a wink. Instead of man-into-beast, we have gremlin-into-beast. At first glance, there's a fun juxtaposition that's a send-up of the werewolf. The gremlin of folklore engages in subtle mischief, causing things that work to malfunction. Whereas the swine is represents consumption gone wrong, or as Bricktop would say -- is as "greedy as a pig".

Of course, in Malifaux there's more in kind between gremlins and pigs. Malifaux gremlins are more reckless to the point of no self-preservation. And Malifaux pigs charge into gobble up anything that gets to close to them.  So I see it more as the "imprint took hold" idea.

As to the minis, I like this one particular pose of the standing figure. It's the classic werewolf howl stance.   I see the color scheme in mid-transformation between gremlin and pig which I figured would be a fun challenge to get both tones right, especially since green and pink don't blend well.

Above all I wanted to avoid making them look like a boar lycanthrope.  For the uninitiated, that's an old D&D monster called wereboar.  World of Warcraft has a similar looking creature called a quillboar.  Both are all brown and red earth-tones.

Swine-Cursed Color Scheme
  • Gremlin Skin - Base: Reaper Fair Skin and Worn Olive, Wash: Reaper Worn Olive, Highlight: Reaper Moldy Skin 
  • Pig Skin - Base for Main Skintone: Reaper Maiden Flesh mixed with Entrail Pink then a thin wash of Maiden Flesh overtop
  • Transition from Gremlin to Pig - Heavy glazes of Reaper Maiden Flesh between the two
  • Overalls -  Heavy Glaze of Sky Blue (I changed this later on though to Reaper HD Golden Brown and Delta Ceramcoat Autumn Brown)

Unfortunately, I forgot to take initial coat pictures.  But it was white primer, black paint wash for separation and some base coats as listed above.

I decided to make the transformation to go from the upper extremities inward.  The arms and face were the most distorted and pig-like with a pink tone, while the torso and legs were gremlin with a green tone.  But while the face was fine - the arms came off mismatched, not transitional.  It looked as an action figure had the wrong arms popped in, complete with demarcation gap. 

So I pulled the gremlin green skin tone further down the shoulder and onto the bicep.  That fixed the action figure problem.  I put this figure down for a few days and would walk past it every now and again...

... and I still didn't like what I saw.  The blue color overalls clashed with the other colors on the figure.  So it was time to change it to brown. 
The overall result was... okay.  I don't think I used enough colors here.  But I learned a lot about undercoating and heavy glazes as a result of this (the main lesson: actually use an undercoat on a figure with a transition scheme *facepalm*).  

So... less a successful paint job than a successful painting experience.


Thursday, June 6, 2019

Penelope: The Color of a Dog

Anthropologists credit humanity's survival against Neanderthals with its domestication of dogs.  This means my childhood home would probably have starved to death in ancient times. Growing up, everyone except myself had allergies to cats and dogs. So beyond the once-in-a-lifetime hamster and a series of fish, I never got to live with a pet until I was nearly in my 30's.

Although I'd always pictured myself as a cat person, I married into a dog home and converted. Look - I can admit I got very lucky in how I was eased into the dog world. My "starter" dog was very timid around other dogs and people - with the exception of my immediate family.  My second dog loved people but was anti-social with her own kind. Now, we're raising a puppy who is social with dogs and humans alike.

I really didn't start paying attention to the colors of a dog's coat until my second dog, Am-mi. She was visually striking. Her coat had a light-brown hue that would get very red in the summer, and dark fur pigmentation around her eyes that gave her an Elizabeth Taylor as Cleopatra look. Once a month, someone would comment she looked like a fox.  Every week, people stopped to ask me what breed she was. (The unimpressive answer: a mutt).

It's in these interactions that I recognized how often humans make that impulsive connection between coat and breed: a dog-lover's search to find the right companion that will meld with one's home. (Though now raising a puppy, I find I agree that the breed is really only as good as as the owner.)

So deciding what to paint my first canine figure carried some weight with me.  I'm looking at Penelope, Ulix's partner in herding pigs.  Malifaux books describe her as "a brown merle coat -- her eyes... ice blue in color."

The problem with painting her "merle" is that it looks Dalmatian-esque or a like a glaring palette mistake since the mutation neuters some pigmentation. I wanted my first foray into paint to not look unfinished.  So I opted to try my hand at a brindled coat instead. The brindle has a tiger stripe marking overtop of a more blotchy under-pattern.

Penelope Color Palette
  • Eyes - Black Dot: Vallejo Black; Center: Reaper Lighter French Blue
  • Muzzle  - Base: Reaper Cloudy Grey, Wash: Reaper Dusky Skin Shadow
  • Undercoat - Base: Reaper Desert Tan; Splotches: Reaper Golden Brown, Wash: FolkArt Coffee Bean
  • "Merle" Coat - Base: Mix of FolkArt Walnut Brown and Cloudy Grey (very thin) also Dusky Skin and Ashen Brown highlights
  • Chest & Forelegs - Base: Mixture of Reaper Desert Tan & Apple Barrel Antique White; Highlight: Reaper Bloodless Skin

First coats to get the blotchy under-pattern I mentioned above.  It looks like a failed pattern here, but I trusted my instincts that the brindle application would pull it together.
 

First passes on the brindle stripes filled the coat out they way I wanted.
  f


A few grey highlights to add some shine to the brindle stripes of the coat.


Overall very happy with the final pics.  The brindle coat came out the way I hoped it would - and it's a good day when you can say that!

Thursday, March 28, 2019

Slop Haulers: Lob Food and Heal Up

One of the biggest challenges in gaming is balancing the realism with abstraction. Too much realism devolves into rule-heavy slog-fests.  Heavy abstraction bears fruit much faster - you get right to the fun of the game.  But over time, its all the same repetitive blocky shape and reality gives way to loopholes.

Let's focus on heavy abstraction and how its used to represent "getting hurt" and "getting better".

The most common measuring stick for getting hurt is the hit point system.  Healing comes from different sources. Fantasy games usually lean on clerics with godly spells.  Modern and sci-fi games may lean on devices like a stimpack which may soon have a real life equivalent

But both types usually have a fascination with food where the abstraction gives way to the loophole.  Eating an apple could arguably heal a hit point or two.  But why would a bushel of apples in one sitting become nigh magical healing devices?

It's not like this is relegated to a few games -- this is a weirdly popular mechanic.  The near-dead character stumbles away victorious from the boss battle to open a chest with a chicken dinner in it, which fully restores all health.  Or mid battle, the gamer can live pause to rifle through inventory to eat an apple.  OK sure - eating properly aids the healing process, but only with proper rest.  If I've been shot in the leg, pigging out on power bars isn't going to make the wound close.  

I've been reflecting on all this when looking at Malifaux's slop haulers, and wondering if they creative team at Wyrd have decided the loophole is great source of comedy.  Slop Haulers are gremlins that haul buckets of vegetable matter and swill around so they can be tossed onto fellow pigs (and gremlins).  To heal them.  In mid-battle. We've gone full-in on the next level of abstraction: you don't even have to stop and eat - just get slathered in tossed vegetable matter. 

Though admittedly, it's tonally accurate for the Gremlin faction...

So onto the figures themselves.  The expressions on these two poor saps look like they are shouldering the unsung hero spot of any gremlin crew.  I'm going to make it clear they are trudging through the swampy mud to keep their allies going.

Pig feed doesn't look like green slop to me.  Wet yes - but it should be made of grains and oats and the like.  So I'm going for a "mash" look.  But it needs to be wet too.  Sounds kind of gross.  So a great reference would be the most disgusting school lunches in the world.  Done.  Reaper's Palomino Gold and Khaki Triad would work well but I'm going to sprinkle in some FolkArt equivalents.

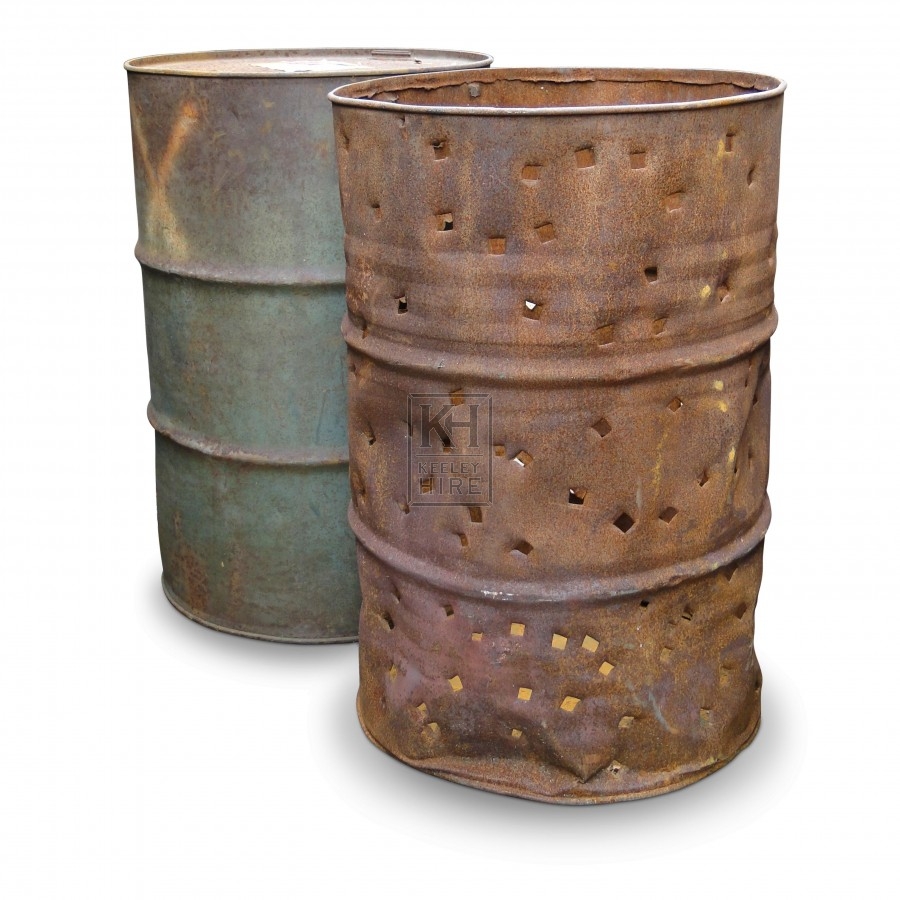
As to the second hauler (without the hat), he seems to be carrying an oil drum.  Where they got oil drums in Malifaux, who knows.  But let's make the most of it.  I wanted to avoid modern colors and thought this one in the background was closest to a Victorian color palette while still looking old.

Slop Hauler Color Scheme
  • Skin - Base: Reaper Fair Skin and Reaper Worn Olive, Shadow (Wash): Reaper Worn Olive, Highlights: Reaper Moldy Skin 
  • Shirt -  Base: Reaper Concrete Grey, Shadow (Wash): Reaper Moldy Skin, Highlights: Reaper Bloodless Skin
  • Gloves - Reaper Darker Greys
  • Buckets - Base: Ceramcoat Autumn Brown, Shadow (wash): Ceramcoat Cinnamon
  • Hat and Pants -  Base: Reaper Ashen Brown, Shadow (Wash): Ceramcoat Dark Forest Green 
  • Old Oil Drum - Base: Apple Barrel Wedgewood Green and Reaper Ashen Brown glaze, Highlights: Reaper Dusky Skin Highlight and Wedgewood, Reaper Ruddy Brown toward rims
  • Pig Slop -  Base: FolkArt Ochre Yellow Shadow (Wash): FolkArt Honeycomb wash, golden brown shadows, Wet Blend: pools of Folk Art Fawn, Reaper Tusk Ivory 
  • Leather -  Base: FolkArt English Mustard, Shadow (Wash): FolkArt Walnut Brown glaze
  • Suspenders -  Base: Reaper Military Grey
  • Muddy Bits  Shadow (Wash): Ceramcoat Autumn Brown
Being that these guys traipse through the mud weighed down with containers of swill, I didn't pin the mini down like I normally would. Instead I used my spackle (for mud), made the impressions of their feet into the base, solidified the spackle with some watered down white glue, and then super-glued them right on. 

Slop Hauler 1 didn't need a lot of green stuff.  I glued the one bucket to his elbow.  I didn't have the same options with the other one (which I would regret later).

When ever you have two hands that meet together, you are sure to run into a lot of gaps.  This was no exception as his left shoulder looked like it had been dislocated.  Serious scultping work and sanding.

Priming used Army Painter's Uniform Grey, then black wash and drybrush white.  This is where craft paints normally work better for me - as the "dry part" usually easier to get.  But I got it too wet and got this mess.   Worse yet, the drybrushing sheared the other bucket right off the mini.  A lot of swearing this night.

Weird detail - on the right you can see this gremlin is not wearing a knit cap.  He's wearing a doo-rag as evidenced by the flap of material under his carrying stick.

Stoopid bucket.


Here on Slop Hauler 2 you can really see where the white drybrush should have been dryer.  Still - a little more black wash helps.  Not unfixable.


First coats on Slop Hauler 1...

...and his stoopid bucket.


In progress shot of #2 with the straps unpainted.

Slop Hauler one with washes completed.


Slop Hauler 2 with washes completed.


A few notes about the oil drum.  Considering the Malifaux setting is supposed to be late 1800's / early 1900's, a gremlin carrying on oil drum is a serious anachronism.  Why the sculptor didn't decide to use an actual wooden barrel...  

Anyway, color scheme... Black would blend in. Blue would clash. Thought green would be to similar to the skin tone... Until I found a good reference for a weathered oil drum.  Then I was in on it.


Past experience says once a thin plastic piece has snapped, it's just a matter of time before it breaks again, especially when you're manually moving it along a game board.  So I a made little hot glue strand to support the reattachment of the bucket.  Some tuft pieces will do it's job on hiding it.  But first...


... making the base look like wet, goopy mud.  I just added some Vallejo's liquid water to the base,  being careful not to get directly on the feet


A little heavy glaze of mud color (Ceramcoat Autumn Brown) on the feet and a tiny bit of mud spatter. Then hide that hot glue support with a tuft of grass.


While painting the figures while on the base saved me the aggravation of having to put pins in those tiny gremlin feet, my thumbs unfortunately wore away at the bases.