Thursday, October 24, 2019

Bloodwretches: Neverborn Mid-Transformation

My wife is petrified of asylums.  We started watching American Horror Story: Asylum. At the end of the first episode, a reporter writing an expose is admitted involuntarily as a patient. We never saw another, it had tapped a primal fear of hers so strongly: that you would be declared insane and locked away to lose all agency over yourself.

Meanwhile the guards and the doctors get to do whatever they want...

The history of Victorian asylums stoke those fears, and the Malifaux starter set definitely plays upon them.  It takes place in an asylum run by a butcher and filled with orderlies telling you to quiet down with a syringe behind their backs.

That's why I see these bloodwretches as inadvertent rebels, fighting from the inside.  Like a molotov cocktail thrown at prison.  It helps that in M2E, they are some of the best models in the set.

When most people painted these models, they painted them as demons.  But as evidenced from the one that has one horn larger than the other, I see them as in the middle of the Human-to-Neverborn process.  These are the only models in the group I know that show this.  So an interesting challenge.

Having learned from the Swine Cursed I wanted to try the undercoat of darker colors and then do a heavy glaze of flesh color on top.

Bloodwretches Color Scheme
  • Skin:  Reaper Tanned Skin blended into Dusky Skin then blended into Reaper Reaper HD Twilight Purple as a base. Then a heavy glaze of the Reaper Caucasian fleshtones
  • Asylum Clothes:  Base: FolkArt Camel 
  • Horns:  Base: Reaper Cloudy Grey, Shadow (Wash): Reaper Cloudy Grey, HighlightsFolkArt Mushroom 

I used the Swine-Cursed approach to the transformation: the transformation and palette changes are in the extremities while the torse and core keep the "normal" colors.
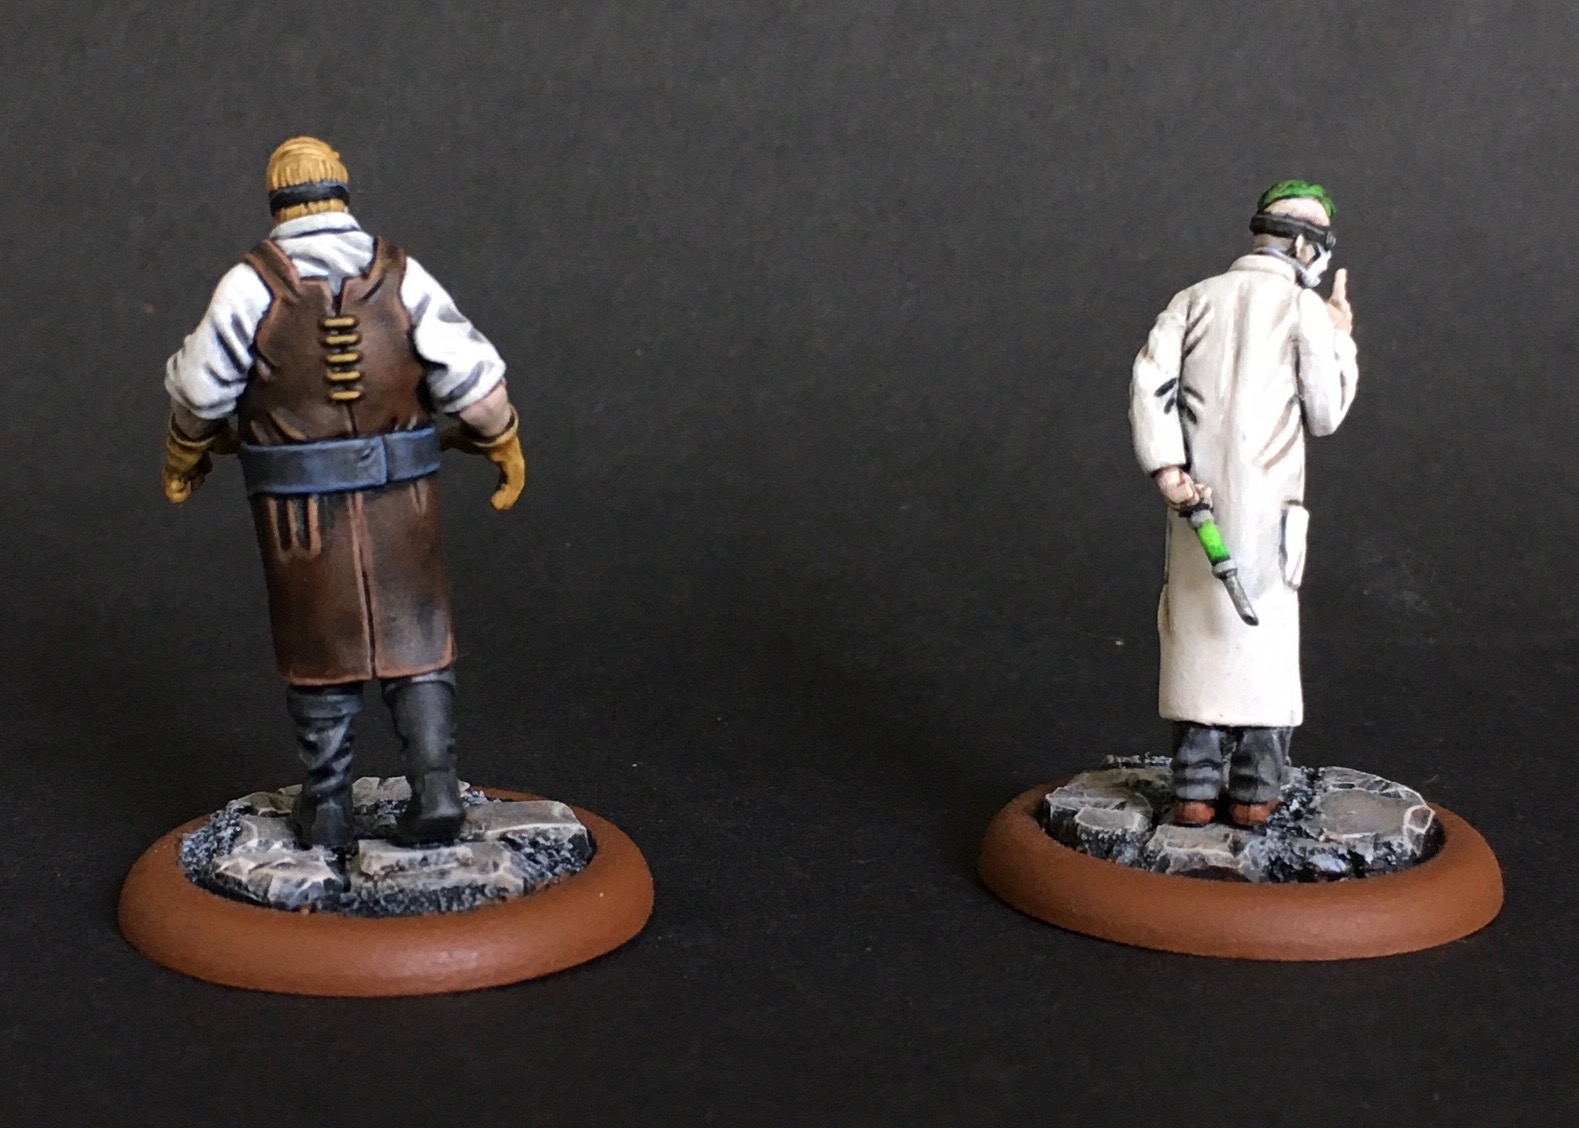
  • On the left figure, you can see what the pre-glaze looks like.  Dark but strong colors. The transition between the Caucasian flesh tone to the purple looks a little muddy
  • On the right figure, I already applied the first glaze of Reaper HD Caucasian Skin to the skin. Those strong colors are now a lot more muted, and the transition looks smoother.


Next was the clothes.  Keeping the clothes in neutral colors helps the focus stay on the skin.


Here's a pic of the "Bloodwretch 1" with the Caucasian Skin glaze


A few wrap up details like buttons and finger nails.

Final notes: I don't think these final pictures get the subtler shifts I got in the skin tones.  And the black hair on the first one looks rougher than I would like.  But I was pleased with the final results.  Proud to put on a table, not in a competition.


Thursday, October 10, 2019

Angel Eyes: If your eyes are so angelic...

...then why is your freaking eye socket so small?

Angel Eyes has to have the smallest eyes on a model.  Or maybe it just feels that way because her name is Angel Eyes, so everyone will be looking at the eyes on your model.  That means you have to pay attention to getting her eyes juuuuuuuuust right.  (Or at least decent to look at.)

So before I dig in to the color scheme... I want to share how I learned to paint eyes.  It's the great white whale of mini painting. There was a really great article on Reaper's website about how to paint eyes that I grew to love.  The key approach: start with the eyes first.

Then Reaper took down The Craft section of the forum where the article resided. It's a shame because the article was written in a reassuring way - the author admitted each shot below was preceded by two screw-ups.  

That said, I did manage to find the pictures related to the article. As to the steps, however, I can only really remember the bullet-level basics.

Step 1: After priming, paint the white of the eye.  Use an off-white color.  Don't worry about getting all around the eye.

Step 2: Paint the Eyeball. Move the brush in a straight line up and down.  Again, don't worry if you go outside the perimeter of the eyeball.


Step 3: Black all around the outside of the eyeball area. Cover up any of the mistakes outside the eye area.

Step 4: Paint the face with your basecoat. Start far away from the eye and slowly work towards the eye - essentially shrinking the black area.  Try to leave a black circle / ring around the eyeball.

Most of this post is around the trials of trying to get the eye right.

Angel Eyes Color Scheme 

Shooting for cool color schemes as opposed to warm color schemes
  • Skin:  Reapers Dusky Skin with Reaper Gem Purple as a base with an heavy glaze of the Reaper Caucasian fleshtones
  • Cloak: FolkArt Thunder Blue - base; FolkArt Night Sky - wash; Reaper Gem Purple - shadow under tones
  • Vest: Base - Worn Olive; Wash - Olive Drab; Overtone Shadow - Apple Barrel Wedgewood Green 
  • Scarf and Pants:  Base - Reaper Concrete Grey
  • Bands: Base - Worn Olive
  • Boots:  Base - Vallejo Black with Reaper Cloudy Grey and FolkArt Charcoal Grey highlights
First things first.  The boots on this model are so thin, there's no way you're going to get a pin in there.  So I cheated and did it on the cloak.


So I had the eyes looking just right.  And then I went back for more detail.  I hate when I do that.

So I had to go back and fix it.  Like 3-4 times.  Eventually with my magnifiers on I saw I got the dot in the right place.  You wouldn't think it from this.  You'd think I was trying to paint a muppet.

The red box is where the black dot for the eyeball is, not the green box.

Eventually I got it.  Here she is with the eye inn the right place.

Final thoughts: I didn't post a lot about painting Angel Eye's cloak or boots or even her skin tone (which didn't pop as much as the Scion did because she is clothed so much.  But over all I am very happy with the end result.


Thursday, September 26, 2019

Scion of Black Blood: Neverborn Indigeneous

The Scion of Black Blood has a very dramatic pose. A weapon in each hand, arms spread out, chest out, wide eyes.  Puffy-chest incarnate. His M2E picture invokes the moment as the crazed fighter wanders through the fog of war out into the edge of battle, taking it all in, just before he's about to go berserk.

And then in third edition, they gave him a name.

Maurice.

Today, I wonder if the Scion has this pose because he's about to flip out that someone named the chosen heir of acid blood something more appropriate for a local British solicitor.

Anyway, I'm going to use the Indigenous color palette I set up on my post about skin tones for Malifaux's Nephilim.  (I painted him about 18 months ago before M3E decided he was half-blooded.)  To get the "peanut worm" translucence -- I chose a purple base, light wash of a deep blue shadow in the crevices and then a thin overcoat of a light but dull blue tone over everything.

As to getting the colors right his other features, I found a decent reference to a 1912 Winchester off Wikipedia (technically a little ahead of the Malifaux's alternate timeline but it still works for what he's holding).

For his horns, I wanted to avoid the typical bone color but wasn't sure what to use.  I little searching and I found a costume piece on Etsy that had a nice greyish / dull violet look. 


Maurice, the tax auditor Scion of Black Blood Color Scheme
  • Skin - Undertone Base: Reaper Twilight Purple Skin, Shadow (Wash): Ceramcoat Purple Smoke, Main Base: Heavy Glaze of FolkArt Linen, Highlights: Reaper Bloodless Skin and FolkArt Parchment
  • Pants -  Undertone Base: Reaper Worn Olive, Shadow (Wash): Olive Drab, Overtone: Heavy Glaze of Ceramcoat Autumn Brown
  • Arm Braces and Shoes: Base: Reaper "Nut Brown"** and Orange Brown, Shadow (Wash): Heavy Wash of Ceramcoat Cinnamon
  • Horns: Undertone Base: Reaper Cloudy Grey, Shadow (Wash): Reaper Cloudy Grey, HighlightsFolkArt Mushroom
  • Metal Bits:  Undertone Base: Reaper Cloudy Grey, Shadow (Wash): Reaper Cloudy Grey, Overtone: Reaper Concrete Grey
** At least I think it's Nut Brown.  It's labelled as "MSP Sample" and I got it for free in a Reaper package.


Here's the first cost of Twilight Purple with a heavy glaze of Linen over the main coat.

From the top down, I could see a mistake in the eye by the nose I would have to clean up.

 First Wash

More lighter skin glaze and 1st coats on clothes.

Leather gauntlets.  Making sure to distinguish them from the pants.

1st wash on clothes and highlighting details

2nd  wash on clothes. Belt clean up and definition. My first attempt at a tattoo - using a thinned out black.  Not great.


Wood grain on gun

Final thoughts: I'm really happy with the style of this Indigenous Nephilim palette.  The overcoat method worked.  The pants could have used a little more definition and shading, but overall I'm proud to bring this one to the table.


Thursday, September 12, 2019

Neverborn Skin Tones

Painting a demon seems kind of boring to me.  Sure, when I was a kid, Chernabog was ominous in Fantasia. But fantasy lines are so rife with this BBG that I now find them commonplace, much less scary.  Red skin, big horns, goat's legs, Tim Curry's voice.  Next please...

So I avoided picking up Nephilim figures from Wyrd's Malifaux line.  It was too in the vein of what I was avoiding.  I thought the nightmares from Malifaux captured my imagination more.

But my "to be painted" collection started growing bunches of these Nephilim: Nekima. Tuco. Angel Eyes. The Scion of Black Blood. The Bloodwretches.  Stuck with them, I struggled on what to use for skin tones.  Especially since each of them have a slightly different background.

So to start, I picked the most unusual part of the their biology: Black Blood.  So what would a creature that had "black blood" look like?  The closest real "Earther" counterpart creatures with purple or violet blood.   Of these the most interesting palette I saw was this picture of the sipuncula or peanut worm.  The creature is interesting because different parts have different palettes based on how the camera captured its translucence.

Having recently picked up the 2nd Edition Core Through the Breach book, I got to read up a little on the history of Malifaux.  The planet starts off with human-like people.  Eventually they got to war with their greatest enemies - the Tyrants.  To defeat them, they turn their blood black - basically a defense mechanism similar to the Alien Xenomorphs.

The lore also talks about a ritual to turn a human into a Neverborn.  From some of the stories I've read, you can tell when someone doesn't look like an indigenous Neverborn who had existed in Malifaux before the Breach opened.  As such, a transformed human can still disguise him or herself a little among other humans.

So I'm classifying them as three types of creatures: Indigenous, Once Human, Mid-Transformation.

One thing I learned from painting the warpigs: A simple two-tone color scheme can have unexpected depth by using a a deeper or darker undercoat and then a heavy glaze of a lighter color for the base coat.  Here the shadow is a third color on the undersides of the model. Final highlighting would be a white skin tone that had little-to-no red in it - probably a linen, recalling the Jen Haley tutorials.
So terms I'm using for this process are: Undercoat, Shadow (Wash), Base (Heavy Glaze).

One specific thing regarding the term "undercoat": I'm still priming white, uniform grey, or black - and THEN applying what I'm calling "undercoat".  (I recognize a prime coat is technically an undercoat, but whatever...)

So I'm breaking out skin tones in three sections:
  • Indigenous (e.g., Nekima and the Scion) would have a more blue/purple skin tone than a human one.  The males have a deeper purple undercoat - Reaper HD Twilight Purple.  The females slightly brighter purple - Reaper HD Gem Purple.  Base coats will be straight Linen color.  No fleshtones - like Caucasian.
  • Once Human (e.g., Tuco and Angel Eyes) may still retain a little of the human skin tone.  Reapers Dusky Skin tone might work as a undercoat base with an base of the Reaper Caucasian fleshtones, with final highlights being Linen.
  • Mid-Transformation (e.g. Bloodwretches) would still retain more of that Caucasian skin tone with blends in the Once Human in the extremities - similar to the Swine-Cursed.

Saturday, September 7, 2019

Warpigs: Gathered in their Marshes...

Painting pigs usually always means "pink".  The whole pig - painted pink.  But looking at various pics of pigs - while they have a pink or "pinkish" skin - there's a fine white fur that makes the pink more fleshtone.

So taking the lessons learned from the Swine Cursed - this calls for undercoating and glazes.

Warpig Color Scheme
  • Main Skin - Undercoat: Reaper Maiden Flesh mixed with Reaper HD Entrail Pink, Base Coat: Heavy Glaze of Reaper HD Fair Skin Shadow and Reaper HD Maiden Flesh, Highlights: Thin Glazes of Reaper HD Caucasian Flesh, Reaper Maiden Flesh, and FolkArt Linen
  • Hooves - Base: FolkArt Butter Pecan with dark brown washes (FolkArt Walnut Brown)
  • Eyes - Base: Reaper HD Bright Red
  • Fur - Autumn Brown with Reaper HD Golden Brown highlights

Having played a game or two running the Ulix and his pig crew, I realized I needed two warpigs for some heavy hitters.  At the time I bought the figure Malifaux only had one sculpt.  Since there's no variance in the sculpt itself, I needed to be able to distinguish the one from the other.  (It makes a huge difference in preventing mistakes mid-game.)

So I decided one pig would NOT have the pre-packaged gremlin with banjo riding him.  The other would.

Warpig 1 had the rider.  Primed white and black wash for separation.

First coat was all pink.  He really looks like a hot dog here.


With the first glaze of fleshtone you can already see the more natural pig skin color. I didn't take good notes here, but I think I used a warmer skin color with the first pig - like Fair Skin Shadow or Tanned Skin.


Another snap after more highlighting.

Warpig 2 needed to have all traces of the gremlin rider removed.  Some Dremel work handled that nicely.  Of course afterwards meant some green stuff work.

Primed and separated below.  I was pleased with how well my green stuff work came out.

I missed taking a snap of the undercoating of pink for Warpig 2.  But below you can see the first heavy glaze.

Putting him on a nice muddy base. 

Final Thoughts:
Very very happy with running an undercoat for painting pig skin tone.  Big success. 

Wish I could remember specifically was I used for Warpig 1 on the first heavy glaze (Reaper Fair Skin? Fair Skin Shadow? Tanned Skin?).  The yellow in the color makes an obvious difference in the tone below.  Warpig 2 looks a little cold in comparison.

Also I could have used a dark brown for separation on the ears rather than black wash.  Separation on the ears and tusks look a little harsh. Still table top ready!


Thursday, August 15, 2019

Swine Cursed 1: The Gremlin-Pig Lycanthrope

Werewolves scared me as a kid.  I didn't need to see An American Werewolf in London in theaters as a kid because the commercials alone kept me up at night.  I was only ten when it came out, so I'm sure an analyst would point out it was all my fear of the inevitability of adulthood.  Or perhaps more accurately, the dread of puberty.

But when I think on it, the real scare was always the loss of control over your body.  Disease doesn't tap that fear so much as the loss of your mental capacities to control your body, your actions, your words -- even your thoughts. In a minute, your mind has kicked out your personality like a bad renter. Or worse yet some small subconscious flaw has back-doored an outside influence to wrest command of the entire ship.

It sort of compliments the imitator fear in that you fit right into the new world that the Body Snatchers built without your conscious acknowledgment.

You secretly wanted this.  That's why the lycanthrope imprint took hold.

That said, the Swine-Cursed isn't a scary figure but an homage to the trope with a wink. Instead of man-into-beast, we have gremlin-into-beast. At first glance, there's a fun juxtaposition that's a send-up of the werewolf. The gremlin of folklore engages in subtle mischief, causing things that work to malfunction. Whereas the swine is represents consumption gone wrong, or as Bricktop would say -- is as "greedy as a pig".

Of course, in Malifaux there's more in kind between gremlins and pigs. Malifaux gremlins are more reckless to the point of no self-preservation. And Malifaux pigs charge into gobble up anything that gets to close to them.  So I see it more as the "imprint took hold" idea.

As to the minis, I like this one particular pose of the standing figure. It's the classic werewolf howl stance.   I see the color scheme in mid-transformation between gremlin and pig which I figured would be a fun challenge to get both tones right, especially since green and pink don't blend well.

Above all I wanted to avoid making them look like a boar lycanthrope.  For the uninitiated, that's an old D&D monster called wereboar.  World of Warcraft has a similar looking creature called a quillboar.  Both are all brown and red earth-tones.

Swine-Cursed Color Scheme
  • Gremlin Skin - Base: Reaper Fair Skin and Worn Olive, Wash: Reaper Worn Olive, Highlight: Reaper Moldy Skin 
  • Pig Skin - Base for Main Skintone: Reaper Maiden Flesh mixed with Entrail Pink then a thin wash of Maiden Flesh overtop
  • Transition from Gremlin to Pig - Heavy glazes of Reaper Maiden Flesh between the two
  • Overalls -  Heavy Glaze of Sky Blue (I changed this later on though to Reaper HD Golden Brown and Delta Ceramcoat Autumn Brown)

Unfortunately, I forgot to take initial coat pictures.  But it was white primer, black paint wash for separation and some base coats as listed above.

I decided to make the transformation to go from the upper extremities inward.  The arms and face were the most distorted and pig-like with a pink tone, while the torso and legs were gremlin with a green tone.  But while the face was fine - the arms came off mismatched, not transitional.  It looked as an action figure had the wrong arms popped in, complete with demarcation gap. 

So I pulled the gremlin green skin tone further down the shoulder and onto the bicep.  That fixed the action figure problem.  I put this figure down for a few days and would walk past it every now and again...

... and I still didn't like what I saw.  The blue color overalls clashed with the other colors on the figure.  So it was time to change it to brown. 
The overall result was... okay.  I don't think I used enough colors here.  But I learned a lot about undercoating and heavy glazes as a result of this (the main lesson: actually use an undercoat on a figure with a transition scheme *facepalm*).  

So... less a successful paint job than a successful painting experience.


Saturday, August 3, 2019

Doppleganger: Fear of the Imitator

This is a sharp left turn from my previous post on dogs, but it has a happy ending.  So hang in with me on this.

Last month, I was dreaming that my puppy was acting strange - almost feral - whenever she was in my peripheral vision.

A vet came to our house and said, "This is not your dog.  It's an imitation.  Right now, the imitator has taken a hold of your dog and she's like a zombie version of her former self.  The only way to get her back is to kill the thing you see before you." 

And he handed me a rock.

I braced myself, sighed, and swung the rock at her head. The blow didn't finish the job. She looked up at me, like she does in the photos my wife takes when she's at her cutest with big pleading eyes.  Except now the side of her skull was lopsided and blood was pouring out of her nose and mouth.

I dispassionately swung the rock again - as if I were performing a task.

And then I woke up... horrified at the dream but moreso at myself.  What the hell was wrong with me?  (And no, I hadn't re-watched The Thing the night before.)

My worst nightmares are always about the imitator.  

And my worst recurring nightmare is right out of "Invasion of the Body Snatchers": someone has clearly been replaced by a copy.  More people start acting strange and I become concerned. Then, everyone I confide in tells me to stop worrying... and here, eat this strange food I've never seen before.  Or drink this cup of milk with a thick mist rolling off the brim.  Or just step in this shadowed back room and relax. Or just close your eyes - we have a surprise for you (no peeking).

I had a string of nightmares like this almost every night during my first trip to Ireland.

I recognize these nightmares are rooted around change and fear of it.  I used to think it was based around the fear that those around you have flipped their moral positions.  Or everyone has started buying into some new hip philosophy that is terribly flawed, one that seeks my own death in a way that everyone else is steadfastly ignorant of.   

While these might be the root for some, I've figured out my nightmares stem from the opposite: I have changed -- or had to change -- and my psyche is straining to catch up.

The first time I pieced it together was all those years ago in Ireland.  During the trip, I became enchanted with the land, the viridity, the people, the stout. Then, the doppelganger nightmares every night. After one rather awful nightmare, I awoke with the clarity that the one who was changing was me, not my surroundings: I had adopted a slight brogue. So I forced myself to stop speaking with the lilt I was so charmed by (and cease what was probably an embarrassing cultural appropriation). I reaffirmed to myself I was a Northeastern American on travel.

The nightmares stopped.

My most recent imitator nightmare definitely revolved around the death of our previous dog, Ammi, and the transition to our new dog.   Ammi's passing left behind a void in our household, and we were lucky to locate a dog that filled it so perfectly.  But I was still struggling with moving on; it was harder on me than I wanted to admit to myself. And my kill-the-fake-puppy nightmare manifested from my lingering numbness, fresh emotional confusion and guilt. 

Numbness over the constant clean up as Ammi slowly lost control of her body and more of her personality. 

Confusion over caring so deeply for a new dog when I still cared so deeply for Ammi.

Guilt over "replacing" her, probably sooner than I was ready to admit to myself. 

Things changed but I was struggling to keep up.   But like most fears, once faced into light, the nightmares dissipate.  Once I realized the root of the issue, I came to peace with the situation.  The nightmares stopped.

So... before I move onto to facing the paint job, I want to clarify a few things

First, Spelling: Malifaux spells their creature doppleganger rather than doppelganger, which comes from the German doppelgänger.

Second, the creature definitely draws for the D&D-ish interpretation of doppelganger - a monster who has supernatural powers to imitate a person - rather than the more innocuous "twin stranger".

Third: the figure itself.  The Malifaux Doppleganger figure can be painted two ways: one as if she's holding a towel, one as if she's grabbing a newly acquired sheet of skin to be added to complete her/its masquerade.  

I've seen many done as a towel, so I chose the latter. The sheet of skin needed something to define it a bit. My inspiration to use veins was Cassandra from the first season of the rebooted Dr. Who series.

Doppleganger Color Scheme
  • Skin - Main Base: Heavy Glaze of Reaper Tanned Highlight, Shadow (Wash): Reaper Tanned Skin, Highlights: Reaper Fair Skin
  • Muscular Bits -  Main Base: Reaper HD Brilliant RedShadow (Wash): Delta Ceramcoat Cinnamon, Highlights: Reaper HD Entrail Pink
  • Hair - Base: Thinned Vallejo Black, Shadow (Wash): Vallejo Black
  • Red and Blue Veins - Undertone Base: Reaper HD Brilliant Red and FolkArt Solid Blue, Shadow (Wash): Heavy Glaze of Reaper Tanned Highlight
  • Viscera - Base: Tamirya Tamiya Clear Red paint, Uhu glue, Vallejo Black (see post from chestofcolors.com)

So I used my standard procedure for painting eyes - which i have learned is to do the eye first.  Disappointingly, the awesome The Craft forums on reapermini.com where I got this idea from has now been taken down.  You can still see ghost references for this method on pinterest.

Anyway, the concept is paint the white of the eye.  Then paint a black dot for the pupil. If you screw up, it's easy to fix because you just start from white again without screwing up a perfectly painted face. 

Then paint everything around the eye in black, slowly making sure you don't nick the white of the eye.  Then paint you skin base coats on the face.

For this figure, I got a deceptively coy, almost anime-like big-eyed expression on the figure.  I was very happy at this point.

Dripping blood would definitely distinguish a sheet of skin from a towel. So I tried a new method I read about from chest of colors. The idea is to make a sticky red "goop" that you pull between areas to get the stringiness of fresh blood.  

Dropped a big wad of the goop and pulled it up to the sheet.  For a first time, I was really proud. Beaming, I showed this off to my wife - who said this looked more like... something else... was shooting from between her legs than it did the sheet dripping.  

Very embarrassed , I took an exacto knife and cut off most of the dried goop. Then applied a method that I've seen for drool that uses fishing line and super glue.  That got a coat of Tamirya Red.  

Big improvement.


In retrospect, this figure would have looked a lot better if I'd done a reddish skin tone as an undercoat, then done the veins and then a heavy glaze work of the base skin tone.