Showing posts with label Reaper. Show all posts

Thursday, October 31, 2019

Rotpatch: The Rotting Pumpkin Golem

Throwback post #2: When the 2015 Thanksgiving holidays were upon me, I decided it was time to work on another pumpkin/scarecrow type miniature.

The previous Christmas, my son had gotten me Reaper's Rotpatch, a golem made of decomposing pumpkins and vines.

To keep a bright orange look, I primed the figure white and used black wash for separation.


Rotpatch Color Scheme
  • Outer Pumpkin shell - Main Base: Heavy Glaze of Reaper HD Fireball OrangeHighlights: Reaper HD Yellow
  • Vines Main Base: Reaper HD Meadow Green, Shadow (Wash):  Reaper Christmas Green, Highlights: FolkArt Bayberry
  • Inner Pumpkin Base: Reaper Tanned HighlightHighlight: Reaper HD Caucasian Flesh 
  • Scythe Base: FolkArt Medium Grey Shadow (Wash): Black and Charcoal Grey, Highlights: FolkArt Light Grey and Dover Grey
  • Moldy Bits - Base: Heavy Glaze of Reaper Ghoul Flesh, Highlights: FolkArt Linen
Below are the first coats using Reaper HD Fireball Orange for the pumpkins.  On the Vines seeing the transition from Reaper HD Meadow Green with Reaper Christmas Green as a wash, and FolkArt Bayberry as a highlight.


Apparently to get a good inner pumpkin color you should use flesh colors -- according to Reaper's (now defunct) Palette Resource anyway. So I used Reaper Tanned Highlight as a base and Caucasian Flesh as a highlight.

In researching what pumpkins in a decaying state should look like, I discovered it's a little scary how many websites are out there showing rotting pumpkins.  Apparently post-Halloween pumpkins are a thing...?

Anyway... I decided if the pumpkins had any brown, they had no structure to keep them up.  So the gourds that make up Rotpatch's body were in that state before collapse (ie, overripe). Overripe pumpkins should get a deeper orange color, leaning towards the red tone. But on figures this small, it's probably too subtle to pick up. 

So the mold will be the visual cue for rot.  I didn't want to go straight for black or dirty grey as a mold color - either.  It looked too lazy. So Reaper Ghoul Flesh as a heavy glaze worked. White mold areas got a final touch was a heavy glaze of Linen.  


Here he is mounted on the base. Also spotted in a few dark brown speckles to indicate the rot is growing.


FINAL THOUGHTS:  I love this figure - but mostly because of the sculpt, not necessarily my paint job.  

This is a great example where overthinking things interfered.  I should have just used a little brown or brownish purple to deliver the rotting look.
  
The figure could have used a cool tone somewhere to offset the warm-centric palette. That would have given it a little more pop... but I cannot think of where I would have put that here (the vines maybe?).

One note on the base - it looks a bit messy here because he actually fits in a pumpkin patch setting I created.


One of these days I'll have to post all my scarecrows and pumpkin nightmares in the pumpkin patch, but here's a group photo I did while getting them ready.


HAPPY HALLOWEEN!

Thursday, February 28, 2019

Toothy Fairy: "They got my tooth!"


Bargain sales on sites like coolminiornot.com are the bane of all New Year's resolutions for me. I see a figure and my imagination runs wild on what I can do with them... and then that's it. I have to pick it up.

Hasslefree Miniatures Toothy Fairy is a great example. I'm pulled in by the unique and the unusual, and this one has that in spades. The tip-toe "shush" pose with one hand. The pair of pliers in the other. The lanky awkward frame. The wavy, wild hair. The ugly buckteeth of a wild hare. And those expressively odd eyes. This is a fey creature of a Neil Gaiman story, a dark fairy belonging to the Unseelie Court.

I liked it enough that I didn't get just one, I got two.  I had a creature in mind I wanted to use in a game, but they needed to fly.  So I also picked up Reaper's Fairy Wing pack.  Some major pinning was in order for these.

So I was surprised at how few pictures there are of this figure. The only one I found was on coolminiornot. The artist's approach there was for a sad and haunted looking creature whereas I wanted to emphasize the otherworldly look I got.

Tricky thing about her is she needs to be assembled and her arms are tiny tiny tiny.

I cut her off the tab with a pair of clippers. Surprisingly I was able to get a pin in the foot without going through the foot (which sadly I do at times).

Assembly requires green stuff. Can't avoid it with those tiny gaps around the arms.

So for the cool figure, I went with a white primer.  On the warm figure I chose a grey primer / black wash / white drybrush.  (End results have proven that I probably should have swapped them.)  Here's a quick snap of the warm figure before the white drybrush.


I decided that one figure should go for a warm tone, the other a cool tone.  I dabbled around a bit on the palette before deciding.

For the cool tone - FolkArt Aqua and transitioned into Anita's Light Green.
For the warm tone - Apple Barrel Burgundy into FolkArt Autumn Leaves into Reaper HD Rusty Red


Cool tone fairy with feather wings in the "Just one minute, I have to yank this kid's tooth out" pose

Warm tone fairy with butterfly wings in the shush pose

These pics were just a comparison of color matching.  Assembling them they looked good. But attaching to the base, they did flop over a bit.  Especially the butterfly wings which we so heavy for the pinning I was doing.


Friday, September 25, 2015

Collodi 2: More Puppet Friends Crash Home Base

So with Reaper's hankercheif ghost done, I knocked out two more to crash the party on Collodi's base: the Reaper "doll with knife" from the Familiar IX pack and Reaper Gingerbread Man from the Familiar IV pack.

First one up was a personal fave mini of mine. I really wanted to paint this guy a while. Could have gone for a wood tone, but I was more partial to an old discarded doll look. 

Primed white, black wash. First coat was a glaze of FolkArt Cappuccino, which has a very fake orange-y tone to it. I wanted a "not real" look to it so that was fine. Then I did some heavier coats with Reaper Tanned Skin and Tanned Highlight. Cracks in the head were painted on, inspired by some creepy dolls I googled.


Couldn't let the straight razor have a plain black color, since I thought most older ones had a wood handle. So I painted in the wood lines in Van Dyke Brown and did a heavy glaze of FolkArt Teddy Bear Tan. 

Next up was psycho gingerbread man. This guy was a simple paint, color scheme based more on the Shrek character "Gingy". Just as funny, but more insane looking.

Not ironically, his main color was Reaper Ginger Cookie. The wood lines on the rolling pin were painted on with Van Dyke Brown and a heavy Delta Ceramcoat Cinnamon glaze (don't leave home without it).

I liked this method of "painting in" the wood grain pattern. Good timing since I needed to do something to help Collodi's look along.

Sunday, September 6, 2015

Collodi 1: Prepping the Base

Collodi!
Finally got the Master of Puppets box set in. Got him assembled, got him primed, got some black wash on him. But before I began painting the Neverborn leader who's inherited the namesake of Pinocchio's author, I wanted to do something with his pose. I love it, but as my painting buddy pointed out, it kind of looks like he's casting a spell.

Maybe that's appropriate for him, but I liked making it more plain that he's a puppeteer. That would obviously involve getting a puppet on his base. So I could just have a Marionette share the base with him, but gluing one on there means you can't separate it out to use in a game.

So I got the idea of just having a little magnetized piece you could pull out and swap in similar sized piece with a doll mounted on. Suddenly using some of the Reaper dolls I'd acquired started to fall in place.  

Game-wise, Collodi has to sit on a 30mm base. So I filled one to the edges with a layer of green stuff and dropped a rare earth magnet against the lip.

Knowing Collodi would have to share a small base with another figure, I made his area of the green stuff thick so he could sit high and back a little. Then I used an Instant Mold made from an Enigma "tavern" wood base.  Carved a little space out where the magnet was using some Reaper minis to juse the width. I did this because I knew I'd never be able to cut off the standard Reaper bases without completely messing up the mini - namely the "kewpie" doll golem and the gingerbread man. Let it harden and then minor filing so the small bits could slide in without scraping. Also drilled two holes where Collodi would sit on the base.

The more I thought about interchanging one puppet the more I relished the thought I could switch out more than one puppet. That means more little bits are needed, to mount the puppet.

The easiest way to create the smaller bits was to get put green stuff on a little plasticard, and slide it into the notch. Vaseline is needed around all sides of the notch so it doesn't stick there. (When the shaping is done, rubbing alcohol will remove the Vaseline). 

From here, you just reapply the mold. Some of the green stuff sticks to the side. A sculpting tool / toothpick helped to separate the small bit out and shape it back.

Let it harden. Filed as needed. Then I Dremeled out a groove on the bottom, cut a little paperclip piece, and superglued it to the bottom. The magnet now has something to grab. (Stupidly forgot I had to do the same with Reaper dolls I didn't cut off the base because the pewter alloy isn't magnetic. I am a very poor scientist.)

Very pleased with how close I got the color matching on the wood. Still only three freakin' colors after priming white: FolkArt Mushroom, a midtone grey (think I used Anita's Grey), and my FolkArt Van Dyke Brown wash. But I discovered the best technique by accident. I applied a heavy Mushroom glaze over the boards, but felt I over-applied it.  So I soaked it the excess with a clean brush but then took off too much.  I was disappointed at first, but once it dried I realized it matched the lighter near white boards perfectly. Going to use this "glaze and remove" process here on out for wood bases.

So I started with the Reaper "hankercheif" ghost from Familiar pack VI (listed as "sock doll" on the onine store). I wanted to make a base that he could sit on. Mirroring my process with Collodi, I applied green stuff up to the lip of the base with a magnet (this time in the middle though). Let that harden, put the small bit, applied more green stuff around it, used Enigma mold, and painted. 

Hadn't discovered the "glaze and remove" technique yet. So the color scheme doesn't match perfectly like on the Collodi base.

Here's the unpainted Collodi with the Reaper hankercheif ghost swapped in. 

Wednesday, July 22, 2015

The Rag Doll 1: The "Lump" Golem

A couple months ago during my miniature acquisitions, I was looking at doll minis.  Wyrd's Puppet Wars have a ton of great options, but I didn't want to make the investment in another whole game I'd have to catch up on painting.  There's the Wyrd Collodi crew, which i am getting now...but at the time it wasn't available. Of course, there was the Voodoo Doll totem for Zoraida which I also bought and have since finished.
I started looking on Reaper's site to see what doll figures they might have, when I realized there was a "rag doll" figure included in the familiars that came with the Bones 1 set.

Excited to realize I already had him, I hunted through my Bones for the familiars.  Next to all the others, he looked like an amorphous blob holding a bouquet and a knife. (That's him on the far right.)
So I looked at the metal version online, and a saw a pile of Bugles stabbed with a knife instead. 
So I painted him white and ran some black wash over him to get some details to pop out.

Ugh. Maybe the back looked better...
Nope. He looked like something off of CakeWrecks.
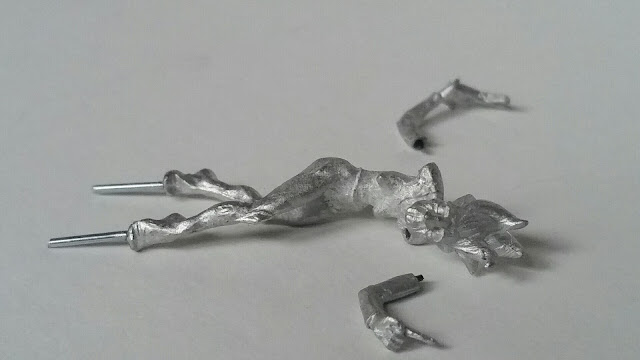
I couldn't discern what was going on here. So I gave up and bought the metal version off Reapers website online to see what exactly was going on with this guy. When I got him, it all started to make sense.  
He's a little Raggedy Andy marching forward holding a dagger with two arms - dragging a pouch behind him.
I'm starting to like this guy but it's really important to understand what the hell is going on with him.
First, he's in mid-march stride - so one foot is up, the other is down. 

Second, the right arm crosses his chest and his two-fingered "hand" is resting on the knife hilt. But there's stitching between the wrist and hand, plus a mold line that makes this confusing to look discern a bit.

Third, he's holding the knife with two "hands" so you can see the two digits and the thumb from the other side.

I'm starting to like him.  But I haven't started painting him yet.  Just to give a perspective of the scale any painter is up against - here he is next to a dime.

Tuesday, May 12, 2015

MCFA Show 2015

Haven't posted in a while. Have been painting - just not anything I've been proud enough to post.  :-(
I DID however attend the Miniature Figure Collectors of America show in Philly today  to get quick peek at some of the entries.
Mainly what l wanted to see was... if I took a picture with this camera-phone, would I get a picture that looked like the pics on coolminiornot, wyrd or reapermini... or would they look as unfinished as mine.
The answers I found:
1) most historical minis are at a much larger scale than I paint. So there's a lot more detail there
2) the halogen lights of the convention center worked for some quick but well-lit shots.  My house is always unnaturally dark
3) the details are a lot better than mine but I bet I could eventually get as good as some of the guys there. It just a matter of add pending several hours on that last coat of whitish sheen.
Some of the pro's though... jeez, they we're crazy good.
Mostly I took pics of the 28 mm size I'm used to painting as opposed to the 54 mm historical scale.   
A Malifaux mini! Jim Richey did a nice job on this one.

Wish I grabbed this painter's name.  Really impressive purple skin tone work.

I had to grab a snap of this Reaper Pathfinder mini just because one of my fellow party members is using it in our current campaign for his paladin.

This one is about 54 mm scale.  But zoom in on the detail on that robe.  It's incredible.

Tuesday, November 25, 2014

The Zoraida Proxy, Part 3: Baba Yaga for Zoraida

My old DM from when I was a teen played Baba Yaga as one of the prime movers and shakers of his world.  There was an old Dragon magazine with an adventure called "The Dancing Hut" by Roger E. Moore that was a keystone. Since then I have had a love for the old crone.

When Reaper Miniatures came out with a mini for her, I ran to my FLGS only to find that they'd just sold out.  (Ironically, the person they'd just sold out to was the DM of my current gaming group who beat me by about two hours buying the last figure.)

So one of my other friends in our gaming group picked her up for me as a Christmas present.  She'd been on deck for quite some time for me to get to.  Eventually I needed a break for undead women on my Seamus crew, and pulled her out.

She came with a pile of sticks to attach to her back, but I didn't feel that fit her for me.  I understand that is part of her legend, but it was too pedestrian for the way I see her.

The figure has a lot of room on the dress and shirt to do some artistry... but I don't see Baba Yaga wearing something ornate.  So I cheaped out here.  Instead I focused on trying something different with the skin.  A good image reference made me want to try a liver spot appearance to the arms.  After the first coat of Reaper Tanned Skin, I went in with a dark grey a dotted up her arm and face in some spots.  Afterwards, I did a glaze of Reaper Dirty Grey to bring out the pallid skin look.

It came out... eh.  Didn't get the effect I wanted, and glazes covered the spots almost completely instead of muting them.  Not to mention there is a really obvious flash line I missed on the left arm which popped out after the first wash.  I couldn't file it down because the pin on the arm was not strong enough.

The position of the figure is a different story.  Can't remember if it was the way I glued her or the way she came out of the package, but one foot was lower than the other - like a bum leg.  Might work for realism, but sure looks awful when basing the figure.  So I decided to have her stepping down.  Keeping consistent with the Terraclips Streets terrain, I thought of an appropriate character image for Baba Yaga.  She's stepping off the crumbling cobblestone of the city and back onto her home territory - the earth - stepping back into woods or the swamp.... leaving destruction in her wake.

That made the struggles on this one worth it.


Saturday, November 8, 2014

...and this is.... what?

Social media sites sometimes irritate me.  The character limitation on posts is annoying, you upload one pic at a time, and defacto editing (e.g., the order of posts) is nigh impossible.

I've wanted to post pictures and some "how to's" on mini painting and gaming works I've done. But the social posts lack the details, they aren't easily searchable, and there's not a lot people on my social sites that would give a damn. 

Eventually I realized, what I'm looking to do is post a blog.  So... I came up with malzowowper...

(umm... what?)

Malzowowper is an almagamation of: 

  • Malifaux
  • Zobeck
  • Warcraft*
  • Reaper (the miniature company)
And if I could have squeezed Pathfinder in there... I probably would have done that too.  But Malzowowper PF sounds like someone getting snarky with me.  (Malzowowper??  *pffff*)

Anyway off we go...  

I love the world of WOW. As a result, I've gathered some cool figures/minis and flavor things along the way.  But anyone looking to find anything regarding the current WOW game may not find anything of value here at all.  Maybe some day I'll post a bit on that.